ข้อผิดพลาด“ Raw-mode ไม่พร้อมใช้งานโดยได้รับความอนุเคราะห์จาก Hyper-V ( VERR_SUPDRV_NO_RAW_MODE_HYPER_V_ROOT )” ปรากฏขึ้นสำหรับ VirtualBox เมื่อพยายามเปิดเครื่องเสมือน สำหรับผู้ใช้บางรายข้อผิดพลาดนี้เกิดขึ้นแม้ว่าเทคโนโลยี Hyper-V จะถูกปิดใช้งานบนเครื่องของพวกเขาก็ตาม

เมื่อพยายามแก้ไขข้อผิดพลาดนี้จุดแรกของคุณคือการตรวจสอบให้แน่ใจว่าไม่ได้เปิดใช้งาน Hyper-V ภายใต้คุณลักษณะของ Windows หากปิดใช้งานไปแล้วผู้กระทำผิดที่เป็นไปได้อื่น ๆ อาจเป็นการตรวจสอบไฮเปอร์ไวเซอร์ที่เปิดใช้งาน Device Guard (Credential Guard) ที่เปิดใช้งานหรือการรบกวนบางอย่างที่อำนวยความสะดวกโดยคุณลักษณะความปลอดภัยของ Windows Defender ที่เรียกว่า Core Isolation
อย่างไรก็ตามในการกำหนดค่าเครื่องรุ่นเก่าคุณอาจเห็นข้อผิดพลาดนี้เนื่องจากการจำลองเสมือนของฮาร์ดแวร์ถูกปิดใช้งานที่ระดับ BIOS หรือ UEFI
1. ปิดใช้งาน Hyper-V Management Tools
สาเหตุอันดับหนึ่งที่ทำให้เกิดข้อผิดพลาด“ Raw-mode ไม่ได้รับความอนุเคราะห์จาก Hyper-V”คือการที่ Hyper-V เปิดใช้งานบนเครื่อง เทคโนโลยีการจำลองเสมือนของ Microsoft ที่เป็นกรรมสิทธิ์นี้ช่วยให้สามารถสร้างเครื่องเสมือนบนระบบ x86 และ x64 ที่ใช้ Windows เวอร์ชันดั้งเดิมได้
แต่ไม่มีทางเลือกอื่นของบุคคลที่สามเช่น VirtualBox หรือ VMware ใช้เพื่อเหตุผลด้านความเสถียร ยิ่งไปกว่านั้นพวกเขาปฏิเสธที่จะทำงานโดยเฉพาะเมื่อเปิดใช้งานเทคโนโลยีนี้ อย่างไรก็ตามตอนนี้ Windows 10 ได้รับการตั้งโปรแกรมให้จัดลำดับความสำคัญของ Hyper-V ผ่านเทคโนโลยีการจำลองเสมือนที่คล้ายกัน
อย่างที่คุณสามารถจินตนาการได้ว่าสิ่งนี้อาจสร้างปัญหาได้มากมายรวมถึงรหัสข้อผิดพลาดVERR_SUPDRV_NO_RAW_MODE_HYPER_V_ROOT ในการแก้ไขคุณจะต้องปิดใช้งาน Hyper-V เพื่อให้ทางเลือกของบุคคลที่สามเข้ามารับช่วงต่อ
และเมื่อต้องทำเช่นนี้คุณมีสองทางข้างหน้า คุณสามารถทำได้โดยตรงจากเทอร์มินัลหรือทำได้จากเมนูโปรแกรมและฟีเจอร์ GUI อย่าลังเลที่จะปฏิบัติตามแนวทางใดก็ได้ที่คุณต้องการ:
ปิดใช้งาน Hyper-V ผ่าน GUI
- กดปุ่มWindows + Rเพื่อเปิดกล่องโต้ตอบเรียกใช้ ถัดไปพิมพ์'appwiz.cpl'และกดEnterเพื่อเปิดโปรแกรมและคุณลักษณะเมนู

- เมื่อคุณอยู่ในเมนูPrograms and Featuresให้ใช้เมนูทางด้านขวาเพื่อคลิกเปิดหรือปิดคุณสมบัติของ Windowsจากบานหน้าต่างด้านซ้าย

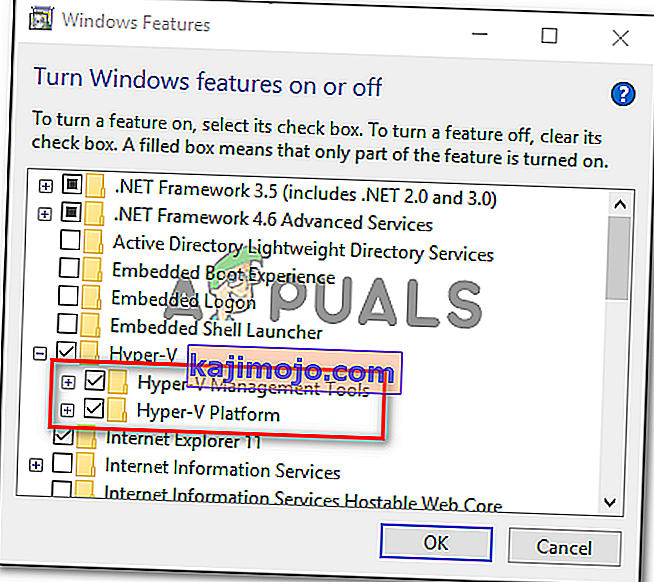
- จากภายในคุณลักษณะของ Windowsเมนูไปข้างหน้าและขยายโฟลเดอร์ Hyper-V จากนั้นให้แน่ใจว่าจะยกเลิกการเลือกช่องที่เกี่ยวข้องกับเครื่องมือ Hyper-V จัดการและแพลตฟอร์ม Hyper-Vก่อนที่จะคลิกตกลง
- รอจนกว่าขั้นตอนจะเสร็จสิ้นจากนั้นรีสตาร์ทคอมพิวเตอร์และดูว่าปัญหาได้รับการแก้ไขหรือไม่หลังจากเริ่มต้นครั้งถัดไป


ปิดใช้งาน Hyper-V ผ่านขั้ว CMD
- กดปุ่มWindows + Rเพื่อเปิดกล่องโต้ตอบเรียกใช้ จากนั้นพิมพ์'cmd'ในกล่องข้อความแล้วกดCtrl + Shift + Enterเพื่อเปิด Command Prompt ขั้นสูง ในที่สุดเมื่อคุณเห็นUAC (การควบคุมบัญชีผู้ใช้)ให้คลิกใช่เพื่อให้สิทธิ์ผู้ดูแลระบบ

- หลังจากที่คุณจัดการเพื่อเข้าสู่เทอร์มินัล CMD ที่ยกระดับแล้วให้พิมพ์หรือวางคำสั่งต่อไปนี้แล้วกดEnterเพื่อปิดใช้งานฟังก์ชัน Hyper-V:
DISM.exe / Online / Disable-Feature: Microsoft-Hyper-V
- เมื่อประมวลผลคำสั่งสำเร็จแล้วให้ปิดหน้าต่าง CMD และรีสตาร์ทคอมพิวเตอร์
- ในการเริ่มต้นครั้งถัดไปให้ทำซ้ำการกระทำที่ทำให้Raw-mode ไม่ได้รับความอนุเคราะห์จากข้อผิดพลาดHyper-Vและดูว่าปัญหาได้รับการแก้ไขแล้วหรือไม่

ในกรณีที่การดำเนินการนี้ไม่อนุญาตให้คุณแก้ไขปัญหาให้ทำตามคำแนะนำด้านล่างสำหรับวิธีอื่นในการแก้ไขปัญหา
2. ปิดใช้งานการตรวจสอบ Hypervisor
ปรากฎว่าคุณอาจพบปัญหานี้แม้ว่าจะปิดใช้งาน Hyper-V แล้วก็ตาม สถานการณ์ยอดนิยมอย่างหนึ่งที่อาจทำให้เกิดปัญหานี้คืออินสแตนซ์ที่บริการHyperVisorLaunchTypeตั้งค่าเป็นAUTO สิ่งนี้จะสิ้นสุดลงด้วยการบังคับให้ระบบของคุณตรวจสอบแอปพลิเคชันที่ใช้ VT-x ก่อนเปิดเครื่องเสมือนทุกครั้ง
ผู้ใช้ที่ได้รับผลกระทบหลายรายสามารถแก้ไขปัญหานี้ได้โดยเรียกใช้ยูทิลิตี้ Bcdedit เพื่อตรวจสอบสถานะของHyperVisorLaunchTypeและปิดใช้งานในกรณีที่ตั้งค่าเป็นอัตโนมัติ
ต่อไปนี้เป็นคำแนะนำโดยย่อเกี่ยวกับการดำเนินการนี้บนคอมพิวเตอร์ Windows ทุกเครื่อง:
- กดปุ่มWindows + Rเพื่อเปิดกล่องโต้ตอบเรียกใช้ จากนั้นพิมพ์'cmd'ในกล่องข้อความจากนั้นกดCtrl + Shift + Enterเพื่อเปิดเทอร์มินัล CMD ที่ยกระดับ
หมายเหตุ:เมื่อคุณมาถึงUAC (User Account Control)ให้คลิกYesเพื่อให้สิทธิ์ผู้ดูแลระบบ
- เมื่อคุณอยู่ในเทอร์มินัล CMD ที่ยกระดับแล้วให้พิมพ์คำสั่งต่อไปนี้แล้วกด Enter เพื่อตรวจสอบสถานะของ HyperVisor:
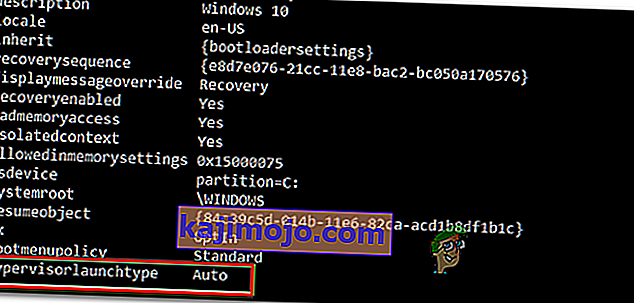
bcdedit
หมายเหตุ : ในกรณีที่สถานะของhypervisorlaunchtypeตั้งค่าเป็นDisabled ให้ข้ามขั้นตอนถัดไปด้านล่างและไปที่วิธีที่ 3โดยตรง
- เมื่อได้ผลลัพธ์แล้วให้เลื่อนลงไปที่ส่วนhypervisorlaunchtypeและดูว่าสถานะถูกตั้งค่าเป็นอัตโนมัติหรือไม่
- ในกรณีที่สถานะของhypervisorlaunchtypeแสดงอัตโนมัติให้พิมพ์หรือวางคำสั่งต่อไปนี้แล้วกดEnterเพื่อตั้งค่าสถานะเป็นDisabled:
bcdedit / set hypervisorlaunchtype ปิด
- หลังจากประมวลผลคำสั่งสำเร็จแล้วให้ปิดเทอร์มินัล CMD ที่ยกระดับแล้วรีสตาร์ทเครื่องโฮสต์
- ในการเริ่มต้นครั้งถัดไปให้เปิดเครื่องเสมือน VirtualBox และดูว่าปัญหาได้รับการแก้ไขแล้วหรือไม่

ในกรณีที่ปัญหาเดิมยังคงมีอยู่ให้เลื่อนลงไปที่การแก้ไขที่เป็นไปได้ถัดไปด้านล่าง
3. ปิดการใช้งาน Device Guard / Credential Guard
ผู้ใช้รายอื่นที่ได้รับผลกระทบสามารถแก้ไขRaw-mode ได้โดยไม่ได้รับความอนุเคราะห์จากข้อผิดพลาดHyper-Vโดยใช้ Gpedit (Local Group Policy Editor) เพื่อปิดใช้งานDevice Guard (หรือที่เรียกว่าCredential Guard)
ปรากฎว่าการรวมกันของซอฟต์แวร์และบริการที่เกี่ยวข้องกับองค์กรซึ่งมุ่งเน้นไปที่การรักษาความปลอดภัยอาจขัดแย้งกับคุณสมบัติ VirtualBox VM บางประการ หากนี่คือผู้กระทำผิดเบื้องหลังVERR_SUPDRV_NO_RAW_MODE_HYPER_V_ROOTคุณสามารถแก้ไขปัญหาได้อย่างง่ายดายโดยปิดใช้งาน Device Guard ผ่าน Local Group Policy Editor
แต่โปรดทราบว่า Windows บางรุ่นอาจไม่มียูทิลิตี้ Gpedit ตามค่าเริ่มต้น Windows 10 Home และเวอร์ชันย่อยอื่น ๆ ที่เกี่ยวข้องจะไม่รวมอยู่ด้วย แต่มีขั้นตอนที่คุณสามารถนำไปติดตั้ง gpedit.msc บน Windows 10
เมื่อคุณแน่ใจแล้วว่า Local Group Policy Editor สามารถเข้าถึงได้ในเวอร์ชัน Windows ของคุณแล้วนี่คือคำแนะนำโดยย่อเกี่ยวกับการปิดใช้งานตัวป้องกันอุปกรณ์:
- กดปุ่มWindows + Rเพื่อเปิดกล่องโต้ตอบเรียกใช้ ถัดไปพิมพ์'gpedit.msc'แล้วกดEnterเพื่อเปิดตัวแก้ไขนโยบายกลุ่มท้องถิ่น

หมายเหตุ:หากคุณได้รับแจ้งจากพรอมต์UAC (การควบคุมบัญชีผู้ใช้)ให้คลิกใช่เพื่อให้สิทธิ์ผู้ดูแลระบบ
- Once you’re inside the Local Group Policy Editor, use the left-hand side menu to navigate to the following location:
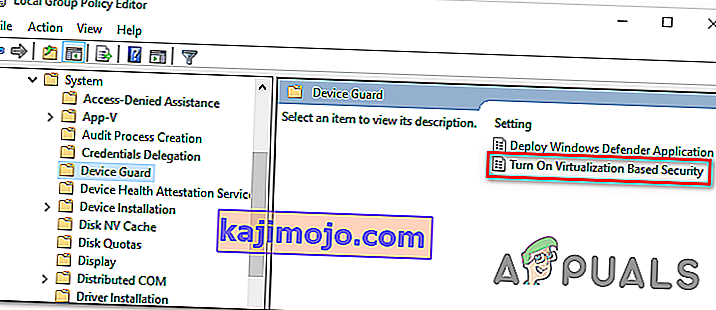
Local Computer Policy > Computer Configuration > Administrative Templates > System > Device Guard
- After you manage to arrive at the correct location, move over to the right-hand section of the Gpedit utility and double-click on Turn on Virtualization Based Security.
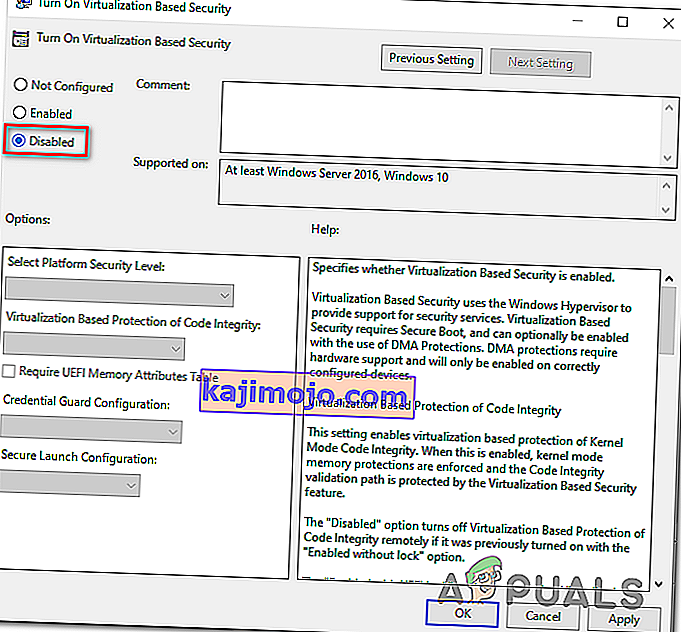
- Once you’re inside the Turn On Virtualization Based Security window, simply change the status to Disabled and click Apply to save the changes.
- After you manage to do this, DO NOT restart your computer yet. Instead, open up an elevated command prompt by pressing Windows key + R, type ‘cmd‘ and then press Ctrl + Shift + Enter.
Note: When you see the UAC (User Account Control) prompt, click Yes to grant the CMD terminal admin clearance.
- Inside the CMD window, paste the following commands and press Enter after each one to delete the related EFI variables that might still cause this problem:
mountvol X: /s copy %WINDIR%\System32\SecConfig.efi X:\EFI\Microsoft\Boot\SecConfig.efi /Y bcdedit /create {0cb3b571-2f2e-4343-a879-d86a476d7215} /d "DebugTool" /application osloader bcdedit /set {0cb3b571-2f2e-4343-a879-d86a476d7215} path "\EFI\Microsoft\Boot\SecConfig.efi" bcdedit /set {bootmgr} bootsequence {0cb3b571-2f2e-4343-a879-d86a476d7215} bcdedit /set {0cb3b571-2f2e-4343-a879-d86a476d7215} loadoptions DISABLE-LSA-ISO,DISABLE-VBS bcdedit /set {0cb3b571-2f2e-4343-a879-d86a476d7215} device partition=X: mountvol X: /d copy %WINDIR%\System32\SecConfig.efi X:\EFI\Microsoft\Boot\SecConfig.efi /Y bcdedit /create {0cb3b571-2f2e-4343-a879-d86a476d7215} /d "DebugTool" /application osloader bcdedit /set {0cb3b571-2f2e-4343-a879-d86a476d7215} path "\EFI\Microsoft\Boot\SecConfig.efi" bcdedit /set {bootmgr} bootsequence {0cb3b571-2f2e-4343-a879-d86a476d7215} bcdedit /set {0cb3b571-2f2e-4343-a879-d86a476d7215} loadoptions DISABLE-LSA-ISO,DISABLE-VBS bcdedit /set {0cb3b571-2f2e-4343-a879-d86a476d7215} device partition=X: mountvol X: /dNote: Keep in mind that X is a placeholder for an unused drive. Adjust the value accordingly.
- After every command is processed successfully, restart the host machine and see if the problem is resolved at the next startup.


In case you’re still encountering the same “Raw-mode is unavailable courtesy of Hyper-V” error, move down to the next method below.
4. Disable Core Isolation in Windows Defender
As it turns out, a security feature from the default AV can also be responsible for this issue. On Windows 10, Windows Defender has a feature colled Core Isolation – it’s essentially an extra layer of virtualization-based security that’s designed to repel more sophisticated attacks.
However, this security feature is known to interfere with the well-functioning of virtual machines (especially the ones facilitated by 3rd-party alternatives.
Several affected users that were also encountering the “Raw-mode is unavailable courtesy of Hyper-V” error have confirmed that they were finally able to fix the issue by enforcing some modifications that allowed them to disable Core isolation from the settings menu of Windows Security.
Here’s a quick guide on disabling Core Isolation from the settings menu of Windows Defender:
- Press Windows key + R to open up a Run dialog box. Next, type “ms-settings:windowsdefender” inside the text box and press Enter to open up the Windows Security tab (former Windows Defender) of the Settings app.

- Once you’re inside the Windows Security tab, move over to the right-hand section and click on Device Security under Protection areas.
- Next, scroll down through the list of available options and click on Core isolation details (under Core isolation).
- Inside the Core isolation menu, ensure that the toggle associated with Memory integrity is set to Off.
- Once the modification is enforced, restart your computer and see if the problem is fixed at the next startup.


In case the toggle associated with Core Isolation is greyed out or you get an error message when you try to set it to OFF, here’s a quick guide on achieving the same result via Registry Editor:
- Press Windows key + R to open up a Run dialog box. Next, type ‘regedit’ inside the text box and press Enter to open up Registry Editor. Then, click Yes at the UAC (User Account Prompt) to grant administrative privileges.

- Inside Registry Editor, use the left-hand section to navigate to the following location:
Computer\HKEY_LOCAL_MACHINE\SYSTEM\CurrentControlSet\Control\DeviceGuard\Scenarios\CredentialGuard
Note: You can either navigate there manually or you can post the location directly into the navigation bar and press Enter to get there instantly.
- After you manage to arrive at the correct location, move over to the right-hand section and double-click on the Enabled key.
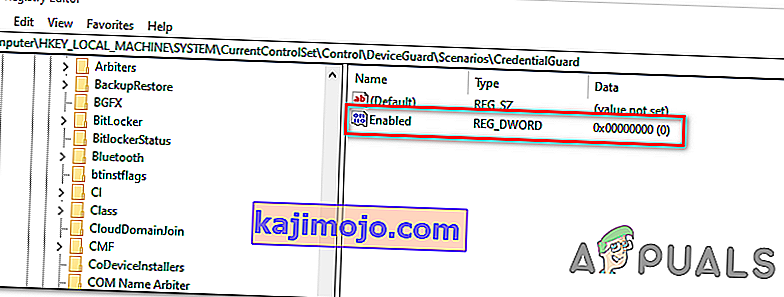
- After you manage to open the Enabled Value, leave the base to Hexadecimal and change the Value data to 0.

- Click Ok to save the modification, then close Registry Editor and restart your computer to see the changes.
- At the next machine startup, repeat the action that was previously causing the VERR_SUPDRV_NO_RAW_MODE_HYPER_V_ROOT error code and see if the problem is still occurring.


In case the issue is still not resolved, move down to the next potential fix below.
5. Enable Virtualization in BIOS or UEFI
Another potential reason that might cause this problem is an instance where hardware virtualization is disabled from BIOS or UEFI settings. Keep in mind that virtualization is enabled by default on every piece of new hardware nowadays, older computer configurations might not have this option enabled by defaults.
If you have an older PC configuration, you might need to enable hardware virtualization manually from your BIOS or UEFI settings. Several affected users have confirmed that the issue was completely resolved after they did this.
Here’s a quick guide on enabling Virtualization from your BIOS or UEFI settings:
- In case you have a BIOS-powered computer, start it up and start pressing the Setup key repeatedly as soon as you see the startup screen. With most configurations, the Setup key is either one of the F keys (F2, F4, F6, F8) or the Del key.
 Note: If you’re using a UEFI-based computer, follow the steps (here) to boot directly into the Advanced Startup options menu. Once you’re there, you can access the UEFI firmware settings directly from that menu.
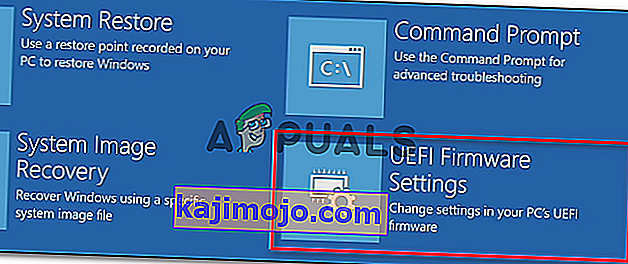
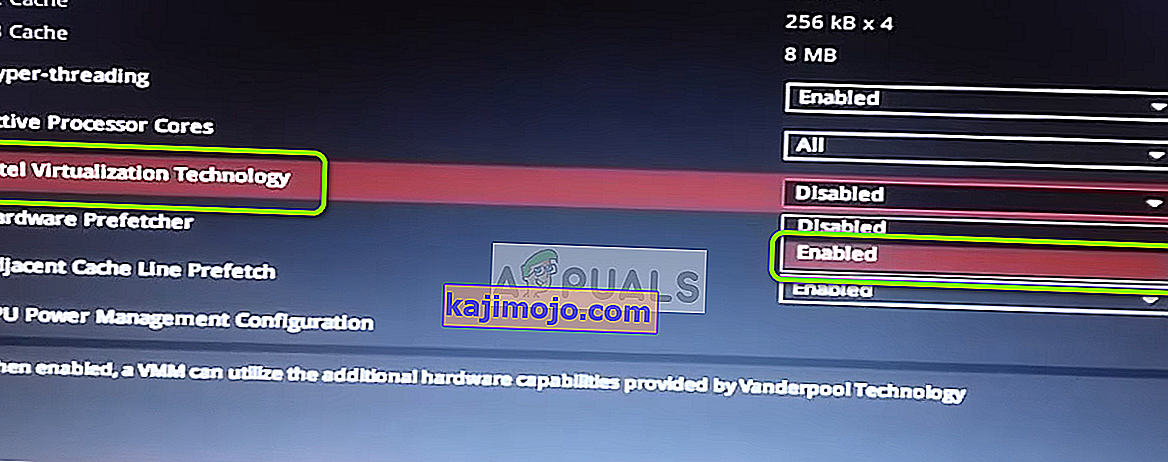
- As soon as you land in your BIOS or UEFI settings, start browsing the menus to find your motherboard equivalent to the virtualization technology (Intel VT-x, Intel Virtualization Technology, AMD-V, Vanderpool, etc.)
- When you manage to locate it, ensure that you set it to Enabled.
Note: In most cases, you will find this option under Processor, Security, Chipset, Advanced, Advanced Chipset Control or Advanced CPU configuration. But keep in mind that your screen might be wildly different from ours depending on the motherboard that you’re using and the CPU manufacturer. In case you’re not able to find the option by yourself, search online for specific steps according to your configuration.
- After you manage to enable the virtualization technology, save the changes you made to your BIOS or UEFI settings and restart your computer to allow it to boot normally.
- At the next startup sequence, repeat the action that was causing the “Raw-mode is unavailable courtesy of Hyper-V” error and see if the problem is now resolved.
 Note: If you’re using a UEFI-based computer, follow the steps (here) to boot directly into the Advanced Startup options menu. Once you’re there, you can access the UEFI firmware settings directly from that menu.

In case the same problem is still persisting, move down to the next potential fix below.