ผู้ใช้มักพบปัญหานี้หลังจากพยายามอัปเดต Windows 10 ผ่านWindows Update (WU) ข้อผิดพลาด0x8024a105ส่งสัญญาณปัญหาเกี่ยวกับคอมโพเนนต์Automatic Updatesโดยปกติหลังจากการอัปเดตล้มเหลวผู้ใช้จะเห็นข้อความต่อไปนี้:
“ มีปัญหาในการดาวน์โหลดอัปเดตบางอย่าง แต่เราจะลองอีกครั้งในภายหลัง หากคุณยังคงเห็นสิ่งนี้ให้ลองค้นหาเว็บหรือติดต่อฝ่ายสนับสนุนเพื่อขอความช่วยเหลือ รหัสข้อผิดพลาดนี้อาจช่วยได้: (0x8024a105)”

หากคุณกำลังประสบกับปัญหานี้อยู่เราได้จัดการเพื่อระบุการแก้ไขที่เป็นไปได้บางอย่างซึ่งช่วยให้ผู้ใช้ประสบความสำเร็จในสถานการณ์เดียวกัน โปรดปฏิบัติตามแต่ละวิธีด้านล่างนี้จนกว่าคุณจะพบโซลูชันที่สามารถแก้ไขปัญหาของคุณได้
วิธีที่ 1: เรียกใช้ตัวแก้ไขปัญหา Windows Update
เริ่มต้นง่ายๆด้วยการเรียกใช้ตัวแก้ไขปัญหาWindows Update ผู้ใช้บางรายได้จัดการเพื่อให้การอัปเดตผ่านไปได้โดยอนุญาตให้ตัวแก้ไขปัญหาในตัวแก้ไขส่วนประกอบที่เสียโดยอัตโนมัติ นี่คือคำแนะนำโดยย่อเกี่ยวกับวิธีเรียกใช้Windows Update Troubleshooter :
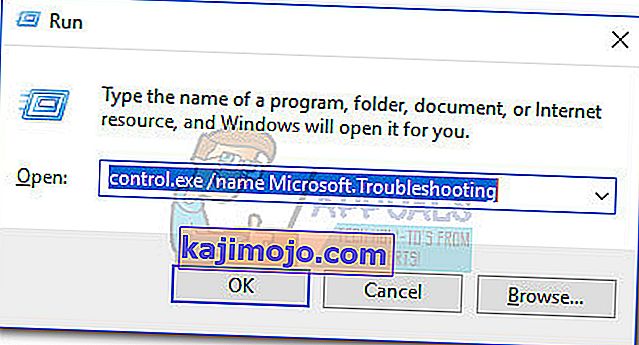
- กดปุ่มWindows + Rเพื่อเปิดหน้าต่าง Run พิมพ์หรือวางสิ่งต่อไปนี้
control.exe / ชื่อ Microsoft. การแก้ไขปัญหา
กดEnterเพื่อเปิดตัวแก้ไขปัญหาในตัว
- ในการแก้ไขปัญหาหน้าต่างให้คลิกที่Windows Updateแล้วคลิกที่Run แก้ปัญหา
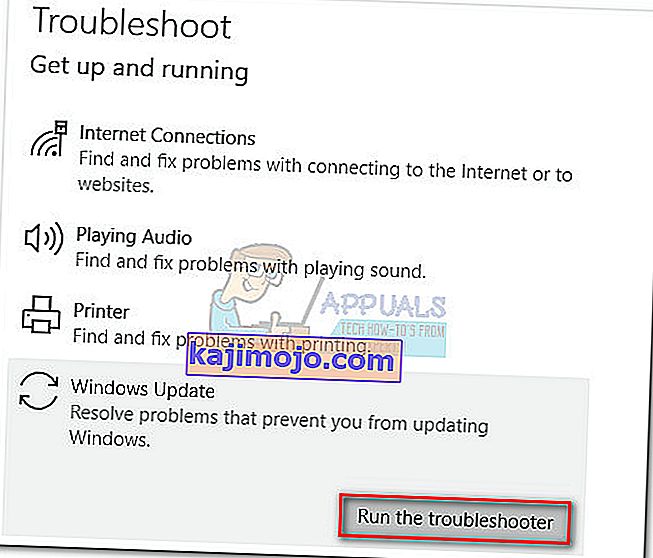
- รอจนกว่าตัวแก้ไขปัญหาจะตรวจพบปัญหากับไคลเอนต์ที่กำลังอัปเดตของคุณ หากสามารถระบุปัญหาใด ๆ ได้ให้ทำตามคำแนะนำบนหน้าจอเพื่อเริ่มการซ่อมแซมอัตโนมัติ โดยปกติคุณจะต้องเลือกใช้การแก้ไขนี้
- หากUpdate Troubleshooterรายงานว่าสามารถซ่อมแซมอะไรได้ให้รีสตาร์ทคอมพิวเตอร์และดูว่าปัญหาได้รับการแก้ไขเมื่อเริ่มต้นครั้งต่อไปหรือไม่


หากการอัปเดตยังคงล้มเหลวด้วยข้อผิดพลาด0x8024a105ให้เลื่อนลงไปที่วิธีที่ 2
วิธีที่ 2: เปลี่ยนการตั้งค่าการควบคุมบัญชีผู้ใช้ (UAC)
หากเครื่องมือแก้ปัญหาไม่ได้จัดการเพื่อแก้ไขปัญหาโดยอัตโนมัติมาดูกันว่าปัญหาไม่ได้สร้างขึ้นโดยการตั้งค่าการควบคุมบัญชีผู้ใช้ ปรากฎว่าการอัปเดตบางรายการล้มเหลวด้วยข้อผิดพลาด0x8024a105เนื่องจากบัญชีที่เข้าสู่ระบบไม่มีสิทธิ์ที่จำเป็น คุณสามารถแก้ไขปัญหานี้ได้อย่างง่ายดายโดยเปลี่ยนการอนุญาตบัญชีผู้ใช้ที่เกี่ยวข้องกับบัญชีของคุณเป็นผู้ดูแลระบบ นี่คือคำแนะนำโดยย่อในการดำเนินการนี้:
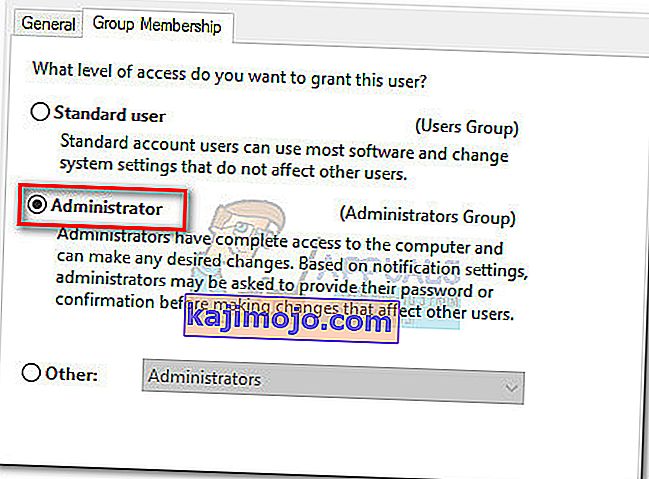
- กดปุ่มWindows + Rเพื่อเปิดหน้าต่าง Run พิมพ์หรือวาง“ netplwiz ” แล้วกดEnterเพื่อเปิดตัวแก้ไขปัญหาในตัว
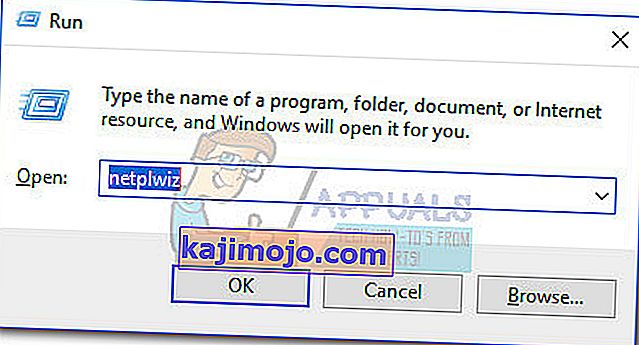
- ในแท็บผู้ใช้ให้เลือกผู้ใช้ที่คุณกำลังใช้งานและคลิกที่คุณสมบัติ
- ในคุณสมบัติของหน้าต่างไปที่สมาชิกกลุ่มและการตั้งค่าระดับการเข้าถึงไปยังผู้ดูแลระบบ กดใช้เพื่อบันทึกการเปลี่ยนแปลงของคุณ
 หมายเหตุ:หากตั้งค่าระดับการเข้าถึงเป็นผู้ดูแลระบบแล้วให้ย้ายไปที่วิธีที่ 3โดยตรง
 - รีบูตเครื่องคอมพิวเตอร์ของคุณและตรวจสอบให้แน่ใจว่าคุณเข้าสู่ระบบด้วยบัญชีผู้ใช้เดียวกัน เมื่อการเริ่มต้นเสร็จสมบูรณ์ให้ลองทำการอัปเดตอีกครั้ง หากคุณเห็นว่าล้มเหลวด้วยข้อผิดพลาด0x8024a105ให้เลื่อนลงไปที่วิธีที่สาม

 หมายเหตุ:หากตั้งค่าระดับการเข้าถึงเป็นผู้ดูแลระบบแล้วให้ย้ายไปที่วิธีที่ 3โดยตรง
วิธีที่ 3: การรีเซ็ตส่วนประกอบของ Windows Updates ด้วยตนเอง
หากวิธีการข้างต้นพิสูจน์แล้วว่าไม่ประสบความสำเร็จเรามีทางเลือกเพียงเล็กน้อย แต่ต้องรีเซ็ตคอมโพเนนต์การอัปเดตของ Windowsด้วยตนเองจากนั้นเริ่มกระบวนการWindows Updateใหม่ จากสี่วิธีที่โดดเด่นวิธีนี้มีโอกาสประสบความสำเร็จสูงกว่า แต่ต้องการการปรับแต่งมากกว่า
นี่คือคำแนะนำโดยย่อในการรีเซ็ตส่วนประกอบของ Windows Updates:
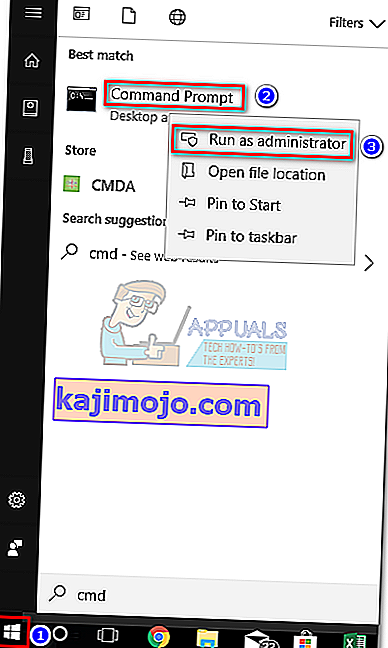
- คลิกแถบเริ่มของ Windows (มุมล่างซ้าย) แล้วค้นหา“ cmd ” จากนั้นคลิกขวาที่พร้อมรับคำสั่งและเลือกเรียกใช้ในฐานะผู้ดูแลระบบ
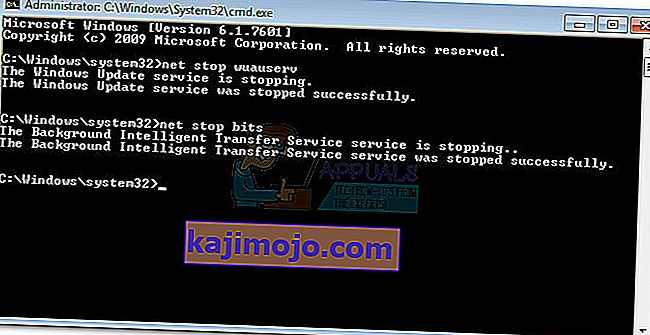
- ในการยกระดับ Command Prompt,เราจะไปหยุดบริการของMSI ติดตั้ง Windows Update, บิตและการเข้ารหัสลับ ในการดำเนินการนี้ให้แทรกคำสั่งต่อไปนี้แล้วกด Enter หลังจากแต่ละคำสั่ง:
net stop wuauserv net stop cryptSvc net stop bits net stop msiserver
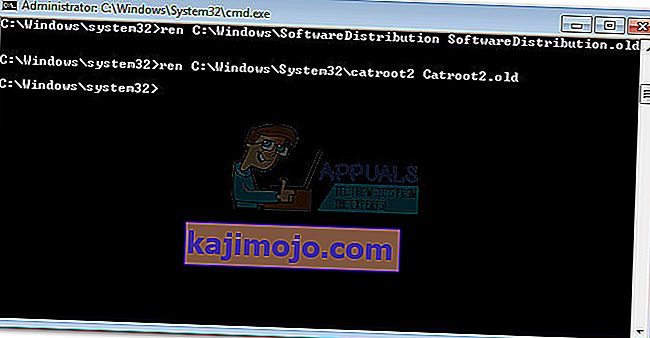
- เมื่อหยุดบริการทั้งหมดแล้วให้เปลี่ยนชื่อโฟลเดอร์SoftwareDistributionและโฟลเดอร์ Catroot2เพื่อบังคับให้ Windows Update เปิดใช้งานส่วนประกอบใหม่ วางหรือพิมพ์สองคำสั่งลงในพรอมต์คำสั่งที่ยกระดับแล้วกด Enter หลังจากแต่ละคำสั่ง:
Ren C: \ Windows \ SoftwareDistribution SoftwareDistribution.old
Ren C: \ Windows \ System32 \ catroot2 Catroot2.old
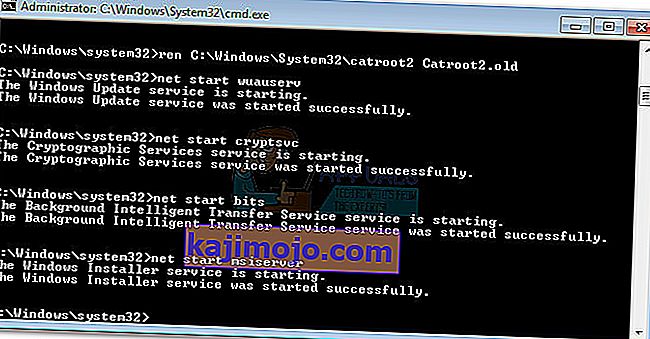
- เมื่อเปลี่ยนชื่อโฟลเดอร์ทั้งสองแล้วก็ถึงเวลาเริ่มบริการของ MSI Installer, BITS, Cryptographic และ Windows Update โดยพิมพ์คำสั่งต่อไปนี้ใน Command Prompt และกดEnterหลังจากแต่ละคำสั่ง:
net start wuauserv net start cryptSvc net start bits net start msiserver
- เมื่อเริ่มบริการใหม่แล้วให้ปิด Command Prompt ที่ยกระดับแล้วรีบูตเครื่องคอมพิวเตอร์


วิธีที่ 4: ลบโฟลเดอร์การแจกจ่ายซอฟต์แวร์
ในบางกรณีปัญหาสามารถแก้ไขได้ง่ายๆโดยการลบโฟลเดอร์โดยใช้ Powershell ดังนั้นในขั้นตอนนี้อันดับแรกเราจะเรียกใช้ PowerShell ในฐานะผู้ดูแลระบบจากนั้นเราจะลบโฟลเดอร์การแจกจ่ายซอฟต์แวร์เพื่อเริ่มกระบวนการอัปเดต สำหรับการที่:
- Press “Windows” + “X” buttons simultaneously and select the “Power Shell(Admin)” option.
- Type in the following command and press “Enter” to execute it.
net stop wuauserv
- Again, type in the following command and press “Enter”.
net stop bits
- Lastly, navigate to the following folder.
C:\Windows\SoftwareDistribution
- Press “Ctrl” + “A” to select all the contents of the folder and press “Shift” + “Del” button to delete them permanently.

- Confirm any prompts that warn you about deleting these files and then reboot your computer to complete the process.
- Now, try to update and check to see if the issue persists.

Once your computer boots back up, see whether you are able to install the updates without the 0x8024a105 error. If you do, try to perform an SFC scan to fix any issues with missing files or drivers.
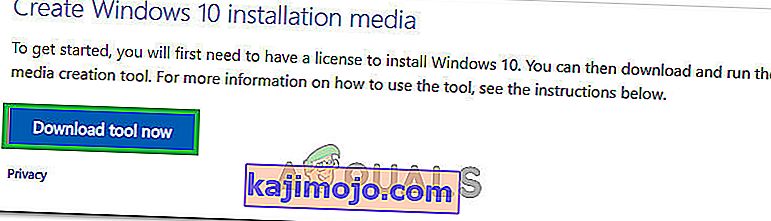
Method 5: Update Using Media Creation Tool
In some cases, you might be unable to update your computer using the default Windows Update process because your Windows might not be able to establish a proper connection with the Update servers. Therefore, in this step, we will be deploying the Windows Media Creation Tool to perform the update for us. It will automatically download and install the update files to upgrade our Windows. For that:
- Download the Windows Media Creation Tool from here.
- Run the executable and follow with the on-screen instructions for the initial setup.
- After the initial setup, select the “Upgrade this PC” option and click on “Next”.
- Accept the License terms and let the installer run.
- The tool will now automatically grab the update files from the servers and update your computer to the latest version available.
- Check to see if doing so has fixed the error.

Method 6: Delete Download Folders
When a new update is downloaded, it is generally stored in some folders on the computer. In this step, we will be deleting some of these folders and which will prompt the operating system to go ahead and download new files which can sometimes clear out the error and the update will be applied normally. For that:
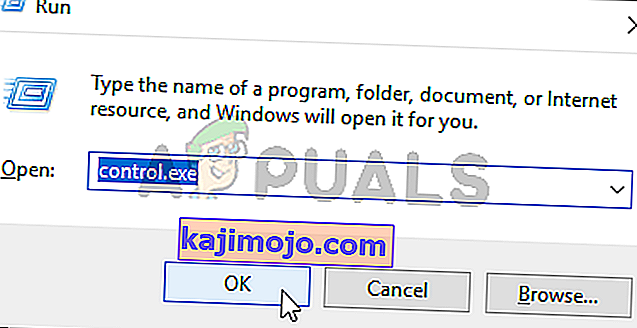
- Press “Windows” + “R” to open the Run prompt.
- Type in “Control Panel” and press “Enter” to launch the classical control panel interface.
- In the Control Panel, click on the “View By:” option and select “Large Icons” from the list.
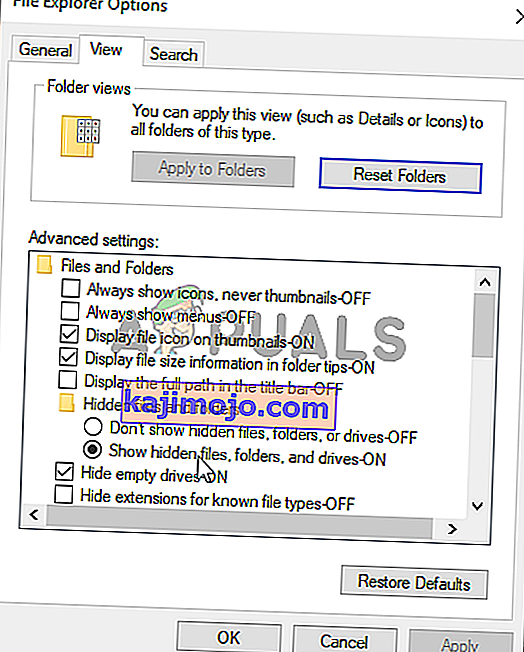
- Click on the “File Explorer Options” and a new window should pop up.
- In the File Explorer Options, click on the “View” button and then double click on the “Files and Folders” button to expand it.
- After that, double click on the ‘Hidden Files and Folders” to expand it as well.
- Check the “Show hidden Files, Folders and Drives” option and click on “Apply” to save your changes.
- Click on “OK” to close out of the window and press “Windows’ + “E” to launch the file explorer.
- In the File Explorer, delete the “$Windows.~WS” and “$Windows. ~BT” folders.
- Make sure to clear out the recycle bin as well so that they cannot be recovered.
- After this, press “Windows’ + “I” to launch settings and click on the “Update and Security” option.

- In Update and Security, click on the “Windows Update” option on the left pane and then click on the “Check for Updates” button.
- Updates will now automatically be downloaded and installed.
- Check to see if the issue persists.


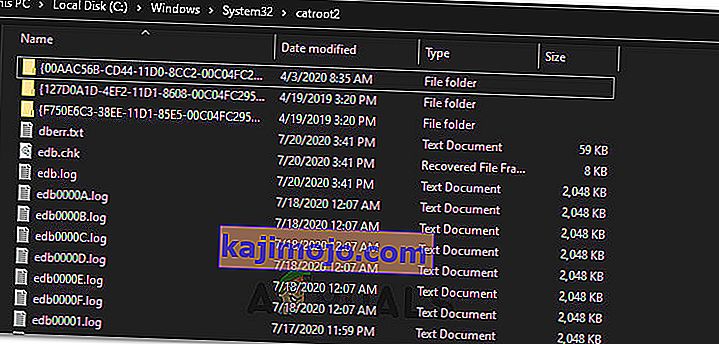
Method 7: Resetting Catroot2 Folder
In some cases, it is possible that the Catroot2 folder and its files have either been corrupted or they have been misconfigured due to which this issue is being triggered. Therefore, in this step, we will first be making some changes from the command prompt and then we will delete the files inside that folder. For that:
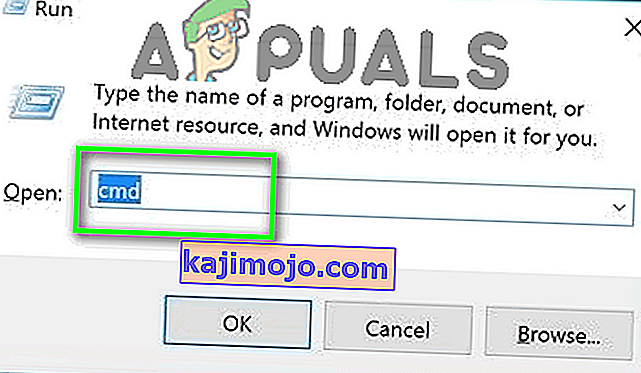
- Press “Windows’ + “R” to launch the run prompt.
- Type in “cmd” and then press “Shift” + “Ctrl” + “Enter” to provide administrative privileges.
- Type in the following command and press “Enter” to execute it.
net stop cryptsvc
- After you have stopped the cryptsvc using the command above, type in the following commands into the command prompt one by one and press “Enter” after each to execute them on your computer.
md %systemroot%system32catroot2.old xcopy %systemroot%system32catroot2 %systemroot%system32catroot2.old /s
- After executing the commands stated above, we will be deleting all the files from the catroot folder without deleting the folder itself.
- Press “Windows’ + “R” to open the Run prompt and type in the following address to navigate to the catroot folder.
C:/Windows/System32/catroot2
- Press “Ctrl” + “A” once inside the folder to select all items inside it and press “Shift” + “Delete” to remove them from your computer.
- After removing these, confirm any prompts that might spring up on your screen.
- After that, open the command prompt back up and execute the following command.
net start cryptsvc
- Try to update your computer and check to see if the issue still persists.


Method 8: Configuring Services to Start Automatically
Sometimes, your computer might be preventing certain services from starting and functioning in the background due to which the update might not be properly installed or configured to be applied on your computer. Therefore, in this step, we will be setting up some services to startup automatically. For that:
- Press “Windows’ + “R” to launch the Run prompt.
- Type in “cmd” and press “Ctrl” + “Shift” + “Enter” to provide admin permissions.

- Type in the following commands one by one in the command prompt and press “Enter” after each to execute them.
SC Config wuauserv start=auto SC Config bits start=auto SC Config cryptsvc start=auto SC Config trustedinstaller start=auto
- This way, we will have configured these services to startup and run automatically in the background.
- Check to see if the issue persists.

Method 9: Re-register Windows Update and BITS Files
It is possible that some windows update files and Bits files might not be properly registered on your computer. Therefore, in this step, we will be re-registering these files on the computer and then we will check to see if that fixes our issue. For that:
- Press “Windows’ + “R’ to open the Run prompt.
- Type in “cmd” and then press the “Ctrl” + “Shift” + “Enter” buttons to provide admin permissions.

Type in the following commands one by one and press “Enter” after each to register the components.regsvr32.exe atl.dll regsvr32.exe urlmon.dll regsvr32.exe mshtml.dll regsvr32.exe shdocvw.dll regsvr32.exe browseui.dll regsvr32.exe jscript.dll regsvr32.exe vbscript.dll regsvr32.exe scrrun.dll regsvr32.exe msxml.dll regsvr32.exe msxml3.dll regsvr32.exe msxml6.dll regsvr32.exe actxprxy.dll regsvr32.exe softpub.dll regsvr32.exe wintrust.dll regsvr32.exe dssenh.dll regsvr32.exe rsaenh.dll regsvr32.exe gpkcsp.dll regsvr32.exe sccbase.dll regsvr32.exe slbcsp.dll regsvr32.exe cryptdlg.dll regsvr32.exe oleaut32.dll regsvr32.exe ole32.dll regsvr32.exe shell32.dll regsvr32.exe initpki.dll regsvr32.exe wuapi.dll regsvr32.exe wuaueng.dll regsvr32.exe wuaueng1.dll regsvr32.exe wucltui.dll regsvr32.exe wups.dll regsvr32.exe wups2.dll regsvr32.exe wuweb.dll regsvr32.exe qmgr.dll regsvr32.exe qmgrprxy.dll regsvr32.exe wucltux.dll regsvr32.exe muweb.dll regsvr32.exe wuwebv.dll
- After executing the commands listed above, check to see if the issue still persists.

Note: After trying the following fixes, if the issue still persists, try to perform a clean boot and check if that fixes it. If it does, update in the clean boot and then get out of it after the update is completed. If that doesn’t work, try to go for a clean install of Windows.