ขึ้นอยู่กับสาขางานของคุณคุณอาจใช้อีเมลเป็นวิธีหลักในการสื่อสารกับลูกค้าของคุณ แต่เช่นเดียวกับเทคโนโลยีทุกชิ้นไม่น่าเชื่อถือ 100% และอาจผิดพลาดได้
Microsoft Outlook เป็นโปรแกรมจัดการอีเมลและแอปพลิเคชันที่ได้รับความนิยมมากที่สุดเนื่องจากผู้สร้างได้สร้างกลิ่นอายของความน่าเชื่อถือและความปลอดภัยรอบตัว แต่ในความเป็นจริง Outlook ยังห่างไกลจากความไว้วางใจอย่างเต็มที่ของเรา ฉันพูดแบบนี้เพราะ Outlook ดูเหมือนจะมีนิสัยไม่ส่งอีเมลสำคัญในช่วงเวลาที่ไม่เหมาะสมที่สุด อย่างน้อยในกรณีของฉันก็มี
แต่ปรากฎว่าเว็บเต็มไปด้วยผู้คนที่มีอีเมลติดอยู่ในกล่องขาเข้าของ Outlook และสาเหตุนั้นมีหลายประการ ปัญหามักจะเป็นเช่นนี้ - คุณเขียนอีเมลและกดปุ่มส่ง หลังจากนั้นไม่นานคุณจะพบว่าอีเมลนั้นยังคงอยู่ในโฟลเดอร์ Outbox โดยไม่มีเจตนาที่จะออกไป
น่าเสียดายที่มีสาเหตุหลายประการที่ Outlook ไม่ส่งอีเมลดังนั้นโปรดเตรียมการแก้ไขปัญหาอย่างละเอียด โชคดีสำหรับคุณเราได้รวบรวมคำแนะนำในการแก้ไขปัญหาที่มีประสิทธิภาพสูงสุดและรวบรวมวิธีการต่างๆที่จะช่วยให้คุณส่งอีเมลได้ตามปกติใน Outlook
แต่ก่อนที่เราจะไปถึงคำแนะนำจริงให้ฉันอธิบายถึงสาเหตุที่พบบ่อยที่สุดที่ทำให้โปรแกรม Outlook ของคุณไม่สามารถส่งอีเมลได้:
- อีเมลมีไฟล์แนบขนาดใหญ่ที่ทำให้กระบวนการส่งช้าหรือหยุดลง
- อีเมลถูกส่งโดยใช้บัญชี Comcast ที่เซิร์ฟเวอร์ขาออกอื่น
- Add-in จะทำเครื่องหมายรายการว่าอ่านแล้วเมื่อคุณดูกล่องขาออก
- รหัสผ่านบัญชีเพิ่งเปลี่ยน
- บัญชีไม่ได้รับการรับรองความถูกต้องอย่างถูกต้องกับเซิร์ฟเวอร์อีเมล
- เซิร์ฟเวอร์ Outlook หรือเซิร์ฟเวอร์อีเมลออฟไลน์
- Outlook ไม่มีบัญชีอีเมลเริ่มต้น
- การตั้งค่าการส่งและรับที่เสียหาย
- โปรแกรมอื่นกำลังเข้าถึงข้อมูล PST หรือ OST (Desktop Search, Lync ฯลฯ )
- ขณะนี้โปรแกรมป้องกันไวรัสกำลังสแกนอีเมลขาออก
- Outlook ไม่สามารถเชื่อมต่อกับเซิร์ฟเวอร์อีเมล
ตอนนี้เรารู้ผู้ร้ายแล้วเรามายุ่งกันดีกว่า ด้านล่างนี้คุณมีชุดวิธีการที่ช่วยให้ผู้ใช้จำนวนมากส่งอีเมลอีกครั้งใน Outlook ทำตามคำแนะนำแต่ละข้อตามลำดับจนกว่าคุณจะพบวิธีแก้ไขที่เหมาะกับคุณ เอาล่ะ.
วิธีที่ 1: ตรวจสอบว่าเซิร์ฟเวอร์ออนไลน์อยู่
ก่อนที่คุณจะดำเนินการเปลี่ยนแปลงที่อาจส่งผลกระทบต่อวิธีการทำงานของ Outlook ของคุณให้กำจัดสาเหตุที่อยู่ไกลเกินเอื้อม สิ่งแรกที่คุณควรตรวจสอบคือสถานะของเซิร์ฟเวอร์อีเมล
หากเซิร์ฟเวอร์อีเมลของคุณออฟไลน์อยู่อีเมลของคุณจะถูกเก็บไว้ในโฟลเดอร์ Outbox จนกว่าปัญหาจะถูกจัดการ วิธีตรวจสอบสถานะเซิร์ฟเวอร์อีเมลของคุณอย่างรวดเร็วคือดูที่มุมขวาล่างของหน้าต่าง Outlook หากมีข้อความว่า“ Connected”หรือ“ Connected to Microsoft Exchange”แสดงว่าข้อผิดพลาดไม่เกี่ยวข้องกับสถานะเซิร์ฟเวอร์

หากมีข้อความว่า“ Working Offline”คุณต้องเปิดแท็บSend / Recieveและคลิกที่ปุ่มWork Offlineเพื่อปิดใช้งาน แต่โปรดทราบว่าคุณอาจต้องเปิดอีเมลและส่งอีกครั้งเพื่อให้ส่งได้อย่างถูกต้อง

ในกรณีที่แสดงข้อความ“ Disconnected”ตรวจสอบให้แน่ใจว่าการเชื่อมต่ออินเทอร์เน็ตของคุณทำงานอย่างถูกต้อง วิธีที่เร็วที่สุดคือเปิดเบราว์เซอร์และท่องอินเทอร์เน็ต หากคุณไม่สามารถโหลดหน้าเว็บในเบราว์เซอร์ได้แสดงว่าคุณมีปัญหาในการเชื่อมต่ออินเทอร์เน็ต
วิธีที่ 2: ส่งข้อความอีเมลอีกครั้ง
ก่อนที่คุณจะได้รับเทคนิคด้วยวิธีการด้านล่างคุณควรลองส่งอีเมลอีกครั้งเพื่อดูว่าสามารถออกจากโฟลเดอร์ Outlook ได้หรือไม่ หากคุณเปิดอีเมลจากโฟลเดอร์ Outbox ในขณะที่กำลังส่ง Outlook จะไม่ลบออกจากโฟลเดอร์นั้นแม้ว่าจะส่งอีเมลสำเร็จก็ตาม
วิธีที่รวดเร็วในการตรวจสอบว่าอีเมลถูกส่งไปแล้วหรือไม่คือการเปิดอีเมลแล้วลองส่งใหม่ด้วยตนเอง คุณสามารถทำได้ง่ายๆโดยเข้าไปที่โฟลเดอร์ outlook แล้วคลิกที่ปุ่มSendอีกครั้ง

วิธีที่ 3: การลบไฟล์แนบขนาดใหญ่
ผู้ให้บริการอีเมลส่วนใหญ่ (โดยเฉพาะผู้ให้บริการฟรี) กำหนดขีด จำกัด ขนาดสูงสุดของไฟล์แนบ ซึ่งหมายความว่าการเพิ่มรูปภาพวิดีโอและไฟล์แนบขนาดใหญ่อื่น ๆ ในอีเมลของคุณสามารถป้องกันไม่ให้คุณส่งข้อความนั้นและข้อความใด ๆ ที่ส่งหลังจากข้อความขนาดใหญ่
ผู้ให้บริการอีเมลส่วนใหญ่ไม่อนุญาตให้มีไฟล์แนบที่มีขนาดใหญ่กว่า 20-25 MB และแม้ว่าขนาดจะอยู่ภายใต้เกณฑ์ของผู้ให้บริการอีเมลของคุณ แต่ก็อาจต้องใช้เวลามากในการส่งหากคุณมีการเชื่อมต่ออินเทอร์เน็ตที่ไม่ดี ซึ่งอาจทำให้คุณเชื่อว่าข้อความนั้นติดอยู่ในโฟลเดอร์ Outbox
หากคุณมีอีเมลอย่างน้อยหนึ่งฉบับที่มีไฟล์แนบในโฟลเดอร์ Outlook ของคุณให้ลบออกและลองส่งอีเมลทดสอบโดยไม่ต้องแนบใด ๆ คุณสามารถทำได้ง่ายๆโดยเปิดโฟลเดอร์Outlookคลิกขวาที่อีเมลที่ปฏิเสธการส่งแล้วคลิกลบ

ตามหลักการทั่วไปให้ใช้ลิงก์ดาวน์โหลดสำหรับไฟล์แนบที่มีขนาดใหญ่กว่า 10 MB เสมอ ด้วยวิธีนี้คุณจะหลีกเลี่ยงความไม่สะดวกได้มาก
วิธีที่ 4: การซิงค์รหัสผ่านบัญชี
อินเทอร์เน็ตเมลช่วยเพิ่มความปลอดภัยในช่วงสองสามปีที่ผ่านมา นอกเหนือจากการตรวจสอบสิทธิ์แบบหนึ่งหรือสองปัจจัยแล้วยังติดตามตำแหน่งทั่วไปที่ผู้ใช้มักเข้าถึงอีเมลของตน หากมีคนพยายามป้อนข้อมูลบัญชีของคุณจากส่วนอื่น ๆ ของโลกซ้ำ ๆ พวกเขาจะล็อกบัญชีอีเมลของคุณโดยอัตโนมัติ คุณจะได้รับแจ้งให้เปลี่ยนรหัสผ่านหรือต้องทำตามขั้นตอนการตรวจสอบสิทธิ์บางอย่าง
หากคุณเพิ่งเปลี่ยนรหัสผ่านอีเมลของคุณมีโอกาสสูงที่คุณจะลืมเปลี่ยนรหัสผ่านจาก Outlook ด้วย นี่คือคำแนะนำโดยย่อเกี่ยวกับวิธีการ:
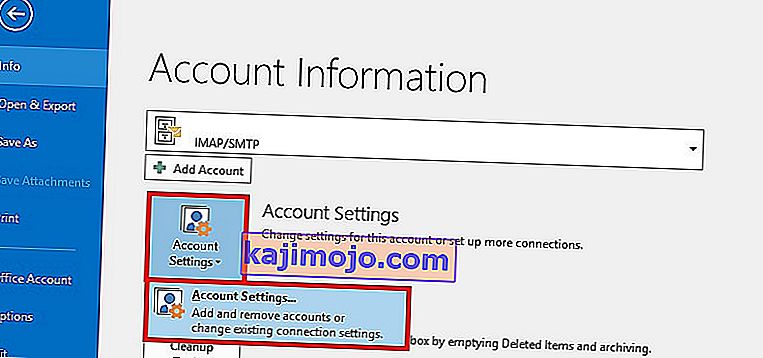
- ใน Outlook ไปที่ไฟล์> การตั้งค่าบัญชี> การตั้งค่าบัญชี
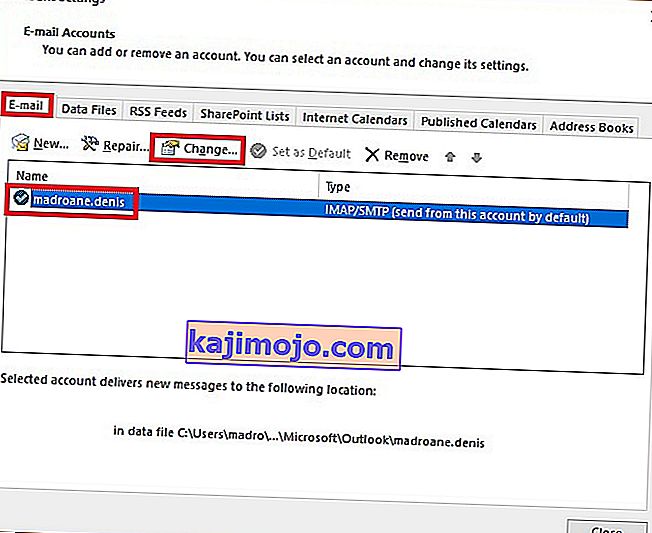
- คลิกที่E-mailแท็บเพื่อขยายเลือกบัญชีอีเมลของคุณและคลิกที่เปลี่ยน
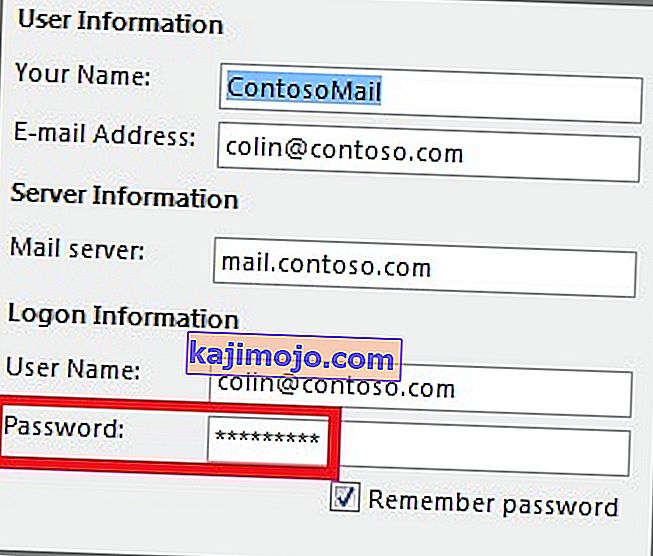
- Now enter your new password in the Password box, check the box next to “Remember password” and hit Next, then Finish.


Method 5: Check your antivirus scans on outgoing emails
Most antivirus suites perform daily email scanning chores. If a virus is found in your outgoing emails, the antivirus software might prevent it from leaving the outbox until you clean the virus. If you recently got a treat alert, visit your antivirus and dead with any virus treat before trying to send the email again.
Also, a lot of antiviruses have the potential to conflict with various versions of Outlook. Generally, antispam plugins of various antiviruses interfere with some Outlook add-ins and may cause the emails to never leave the Outbox folder. Norton and AVG plugins are known to cause problems, but there are definitely others.

If you think there’s a conflict caused by one of the antispam plugins, disable email scanning from your antivirus software.
Method 6: Repairing your Outlook program
If you get to this message without a result, your Outlook program might indeed be damaged. Microsoft Outlook is a highly complex program, so you can imagine there can be a lot of problems in a lot of different places. Luckily, Microsoft has an efficient auto-repair method that can be applied to every Office product. The process might take over an hour to complete, so make sure you have enough time on your hands. Here’s what you need to do:
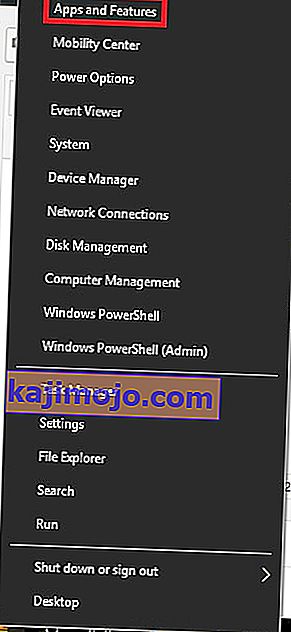
- Close Outlook completely and right-click on the Start button (lower-left corner). From there, select Apps and Features.
- Now scroll down and click on the Outlook entry. Additionally, you can use the search bar to find it more quickly. Once you find it, click on Modify.
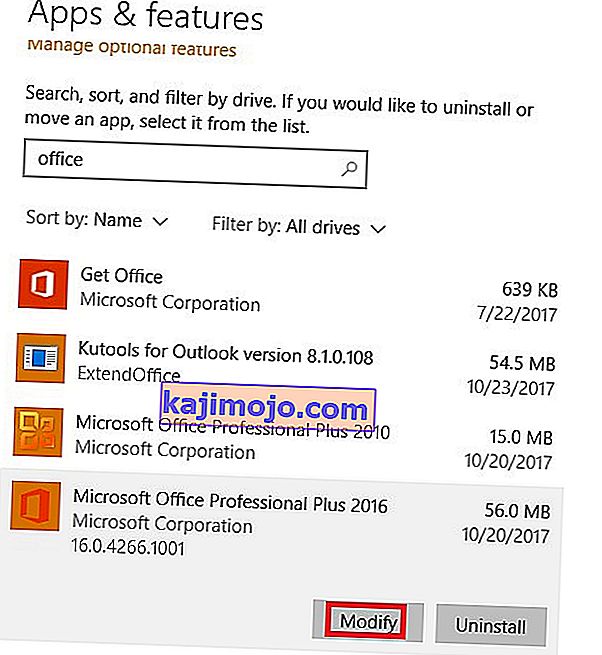 Note: You might have Outlook bundled with other Office products. If that’s the case, search for Office and expand the suite.
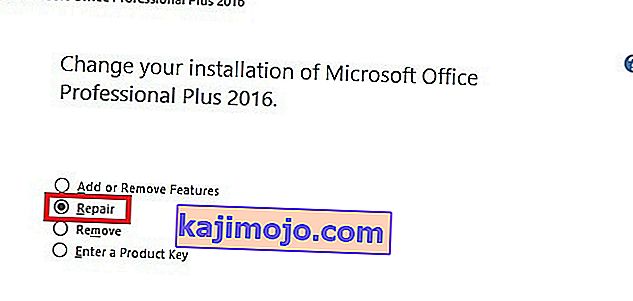
 - Now select Repair and click Continue. Follow up with the next instructions to start the repair process.
- Wait for the process to complete and restart your PC.
- Open Outlook again, delete the mail stuck inside the Outbox folder and send another one.

 Note: You might have Outlook bundled with other Office products. If that’s the case, search for Office and expand the suite.
Method 7: Repairing your Outlook profile
In Outlook, a profile holds together a group of settings that govern how the program performs. Among other settings, it includes a listing of all your accounts, auto-complete information, and personal details. If your email messages never leave the outlook folder, repairing your Outlook profile might just fix the issue. Here’s what you need to do:
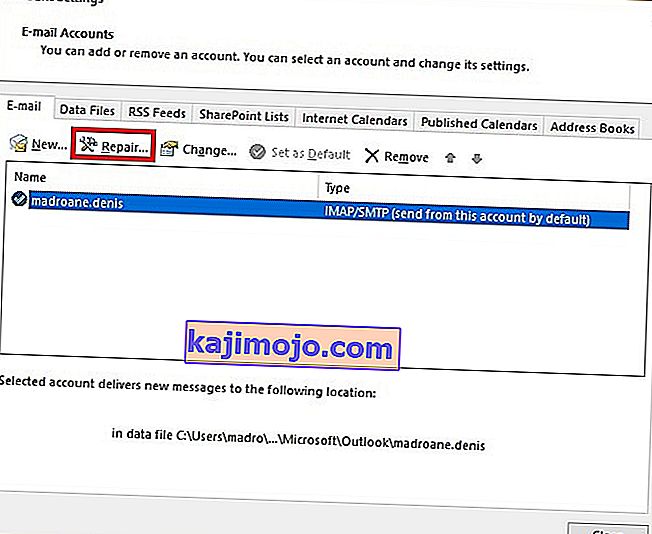
- Go to File > Account Settings > Account Settings.
 Note: In Outlook 2007, go to Tools > Account Settings.
 - Tap the Email tab to expand it and click on your account profile to select it. Once your profile is selected, choose Repair.
- Follow the next prompts to complete the repair wizard and restart Outlook at the end of it.
 Note: In Outlook 2007, go to Tools > Account Settings.
Method 8: Sending an email in Safe Mode
Now it’s time to find out if anyone of Outlook’s add-ins is crashing, thus preventing your email messages from leaving your outbox. The quickest way to disable all add-ins is to launch Outlook in Safe Mode. If you are able to send emails normally while in Safe mode, it’s clear that one of the add-ins is preventing that from happening. Here’s a quick guide on how to do it:
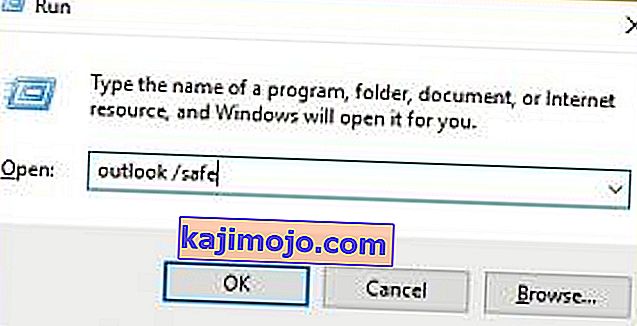
- Make sure Outlook is completely closed.
- Open a Run window, type outlook /safe and hit Enter.
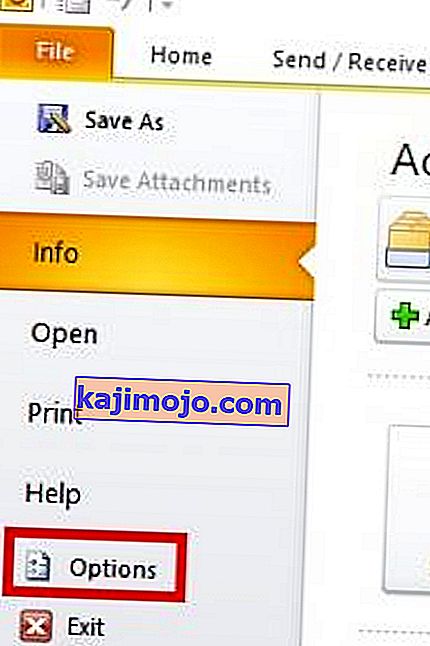
- If Outlook fully starts in Safe Mode, click on the File tab and navigate to Options.
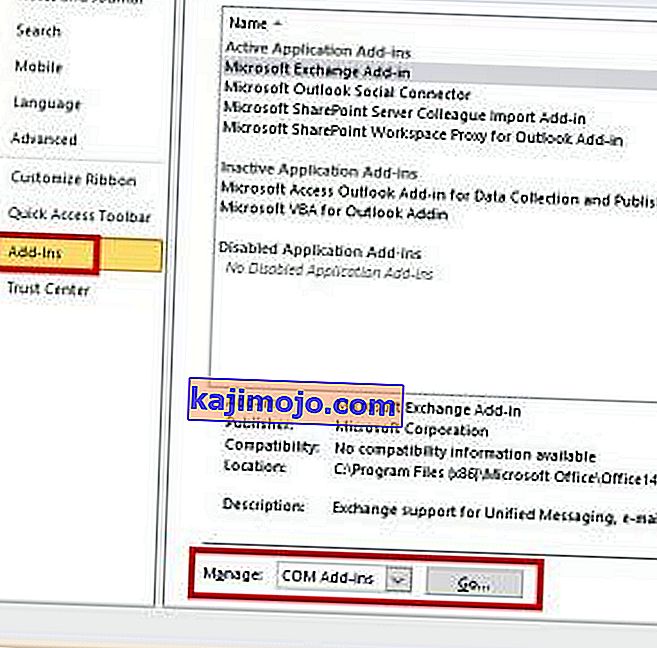
- Now click on the Add-ins tab to expand it. Expand the drop-drop down menu next to Manage (lower-side of the screen) and select COM Add-ins from the list.
- Now take a screenshot with the add-in list and save it somewhere so you’ll know how to restore the normal configuration afterward.
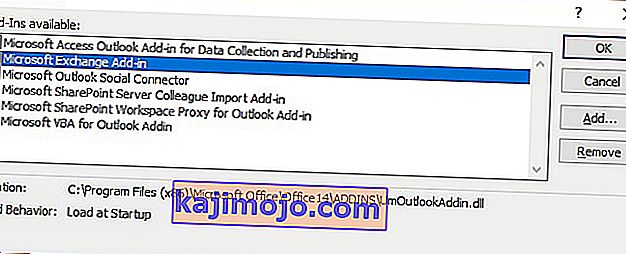
- Clear each selected checkbox and hit OK.
- Close Outlook and try to open it again in normal mode.
- After you start Outlook back in normal mode, try sending an email again and see if it leaves your Outbox. If the message gets sent, proceed to the next step. If it doesn’t send, move over to the next method.
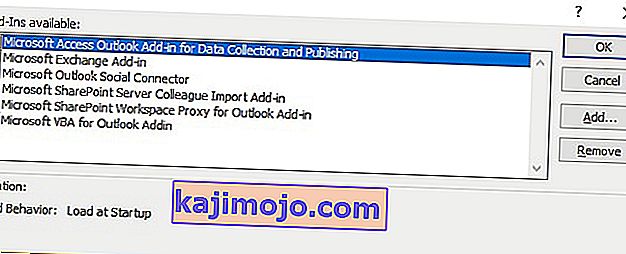
- Return to File > Option> Add-ins and systematically re-enable each add-in again and restart until you pinpoint the addon that creates the conflict.
- Continue operating Outlook with that add-in disabled.
Note: Additionally, you can create a new Outlook profile. This should allow you to send emails normally again.


Method 9: Running the Inbox Repair Tool
Outlook stores your messages and other types of information in a Personal Folders File (PST file). If some information on it becomes corrupted, it might damage some of Outlook functionalities, including the ability to expedite emails from the Outbox folder. However, Microsoft has provided its users with an Inbox Repair Tool capable of repairing PST files. Here’s a quick guide on how to use it:
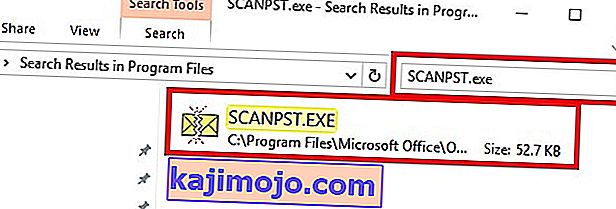
- Close Outlook completely and go to C:\ Program Files or C:\ Program Files (x86) / (x64).
- Once you’re there, use the search box to find SCANPST.exe.
 Note: If you can’t find SCANPST via the search bar, navigate to one of the locations below according to your Outlook version:
Outlook 2016: C:\ Program Files (x86) or (x64) \Microsoft Office \ root \ Office16 Outlook 2013: C:\ Program Files (x86) or (x64) \Microsoft Office \ Office15 Outlook 2010: C:\ Program Files (x86) or (x64) \Microsoft Office \ Office14 Outlook 2007: C:\ Program Files (x86) or (x64) \Microsoft Office \ Office12
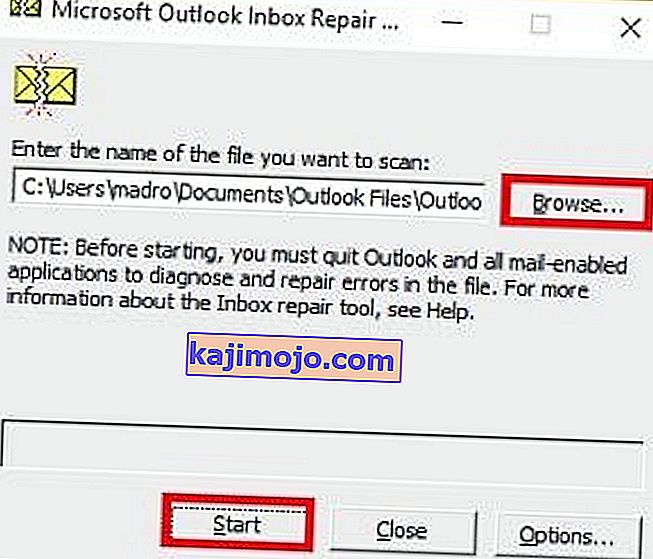
- Open SCANPST.exe and hit the Browse button. Navigate to Documents\Outlook Files to find your PST file. Hit Start to begin scanning your PST file.
- If you have errors or inconsistencies at the end of the scanning process, click the Repair button to fix them.
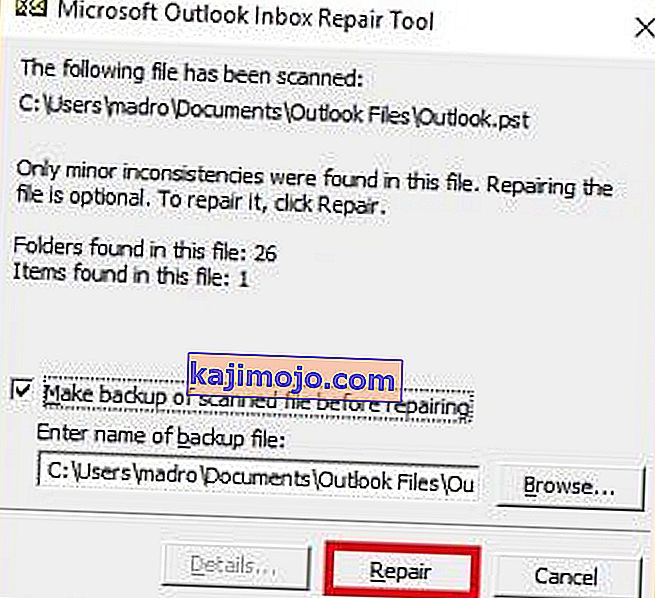
- Start Outlook again and see if your emails manage to leave the Outbox.
 Note: If you can’t find SCANPST via the search bar, navigate to one of the locations below according to your Outlook version:
