0xc000000eข้อผิดพลาดเมื่อพยายามที่จะบูตขึ้นหน้าต่างหมายความว่าคุณจัดการกับความเสียหายBoot ข้อมูลการกำหนดค่า ข้อมูลการกำหนดค่าการเริ่มระบบเป็นที่เก็บข้อมูลส่วนกลางสำหรับตัวเลือกและการตั้งค่าทั้งหมดที่เกี่ยวข้องกับการบูตบนพีซี Windows รุ่นใหม่ ๆ
คุณจะได้รับข้อผิดพลาดนี้เมื่อพยายามบูตอุปกรณ์ของคุณและคุณจะพบกับหน้าจอสีดำที่ให้คำแนะนำเกี่ยวกับวิธีการซ่อมแซมคอมพิวเตอร์ของคุณโดยใช้ดิสก์การติดตั้งหรือไดรฟ์กู้คืน น่าเสียดายที่การมีไดรฟ์กู้คืนเป็นวิธีเดียวที่คุณจะแก้ปัญหานี้ได้ดังนั้นคุณควรเตรียมความพร้อมก่อนเริ่ม หากคุณไม่มีมันค่อนข้างง่ายที่จะสร้างโดยใช้เครื่องมือ Rufus หรือ Windows Media Creation จากพีซีหรือแล็ปท็อปเครื่องอื่น

คุณจะต้องบูตเข้า BIOS เพื่อเปลี่ยนลำดับการบู๊ตและทำให้พีซีของคุณบูตจากไดรฟ์กู้คืนแทนฮาร์ดไดรฟ์ของคุณ โดยทำตามขั้นตอนต่อไปนี้:
- เข้าสู่การตั้งค่าBIOSหรือUEFIโดยกดคีย์ที่ผู้ผลิตแผงวงจรหลักของคุณกำหนดก่อนที่ Windows จะบู๊ต โดยทั่วไปคีย์นี้คือ Esc, Delete, F2, F8, F10, F12 หรือ Backspace ขึ้นอยู่กับผู้ผลิต คุณสามารถค้นหาออนไลน์เกี่ยวกับวิธีการเข้าสู่ BIOSตามด้วยรุ่นคอมพิวเตอร์ของคุณ
- เมื่อเข้าไปข้างในแล้วให้ไปที่Bootใช้คำแนะนำที่พบใน BIOS เพื่อเปลี่ยนลำดับการบูตของคุณและตั้งค่าซีดีรอมหรือพอร์ต USB ให้เป็นอุปกรณ์แรกขึ้นอยู่กับว่าไดรฟ์กู้คืนของคุณเป็นซีดีหรือแฟลชไดรฟ์ .
- บันทึกการตั้งค่าของคุณและออก

วิธีที่ 1: สร้างข้อมูลการกำหนดค่าการเริ่มระบบใหม่
ในการดำเนินการนี้คุณจะต้องบูตคอมพิวเตอร์จากไดรฟ์กู้คืน หากคุณได้กำหนดค่า BIOS ของคุณตามขั้นตอนข้างต้นคุณสามารถทำได้โดยกดปุ่มใดก็ได้เมื่อข้อความแจ้งปรากฏบนหน้าจอ เมื่อคอมพิวเตอร์บูตจากไดรฟ์กู้คืนแล้วให้ใช้ขั้นตอนต่อไปนี้เพื่อสร้าง BCD ใหม่:
- ในกล่องโต้ตอบการตั้งค่า Windows ตั้งค่าทุกอย่างเป็นค่าที่เหมาะสมเลือกภาษาของคุณแล้วคลิก
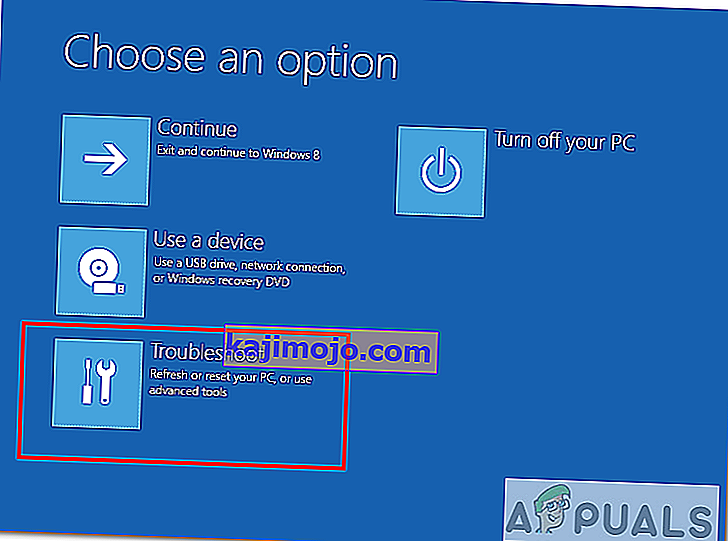
- ที่มุมล่างซ้ายคลิกที่ซ่อมคอมพิวเตอร์ของคุณและเลือกแก้ไขปัญหาจากหน้าจอเลือกตัวเลือก
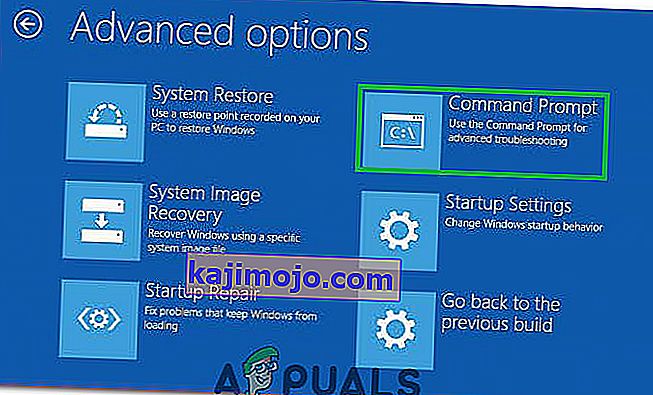
- ในหน้าจอแก้ไขปัญหาให้คลิกตัวเลือกขั้นสูงและคลิกที่พรอมต์คำสั่ง
- เมื่อพรอมต์คำสั่งเปิดขึ้นให้พิมพ์คำสั่งต่อไปนี้โดยกดEnterบนแป้นพิมพ์ของคุณหลังจากแต่ละคำสั่ง:
bootrec / scanos bootrec / fixmbr bootrec / fixboot bootrec / rebuildbcd
- รีบูตเครื่องคอมพิวเตอร์ของคุณและควรบูตได้ดีโดยไม่ต้องเผชิญกับปัญหาอีก

วิธีที่ 2: ซ่อมแซมระบบปฏิบัติการของคุณด้วยไดรฟ์กู้คืน
วิธีนี้จะซ่อมแซมระบบปฏิบัติการของคุณด้วยพรอมต์คำสั่งของไดรฟ์กู้คืนและคุณควรจะสามารถบูตเข้าสู่ Windows ได้โดยไม่ต้องเผชิญกับปัญหาอีก บูตจากไดรฟ์กู้คืนและปฏิบัติตามคำแนะนำด้านล่าง
- ใช้ขั้นตอนที่ 1 ถึง 3 จากวิธีก่อนหน้าเพื่อไปที่Command Promptของไดรฟ์กู้คืน
- เมื่ออยู่ใน Command Prompt ให้พิมพ์คำสั่งด้านล่างตามด้วยEnterบนแป้นพิมพ์เพื่อดำเนินการ StartRep.exeแก้ไขยูทิลิตี้บูตค่าสภาพแวดล้อมและควรแก้ไขข้อผิดพลาด BCD โปรดทราบว่าคุณอาจต้องทำขั้นตอนนี้ซ้ำหลาย ๆ ครั้งในกรณีที่ล้มเหลว
cd x: \ources \ recovery StartRep.exe
- หากขั้นตอนก่อนหน้าในการซ่อมแซม Windows ไม่ได้ผลให้พิมพ์bcdeditใน Command Prompt เพื่อดูค่าของ Windows Boot Manager
- หมายเหตุค่าสำหรับอุปกรณ์ หากไม่รู้จักให้พิมพ์คำสั่งต่อไปนี้แต่ละคำสั่งตามด้วยEnterเพื่อดำเนินการ โปรดทราบว่าคุณควรแทนที่C:ด้วยพาร์ติชันที่ติดตั้งระบบปฏิบัติการของคุณหากจำเป็น
bcdedit / set {DEFAULT.EN_US} พาร์ติชันอุปกรณ์ = c: bcdedit / set {DEFAULT.EN_US} พาร์ติชัน osdevice = c: bcdedit / set {BOOTMGR.EN_US} พาร์ติชันอุปกรณ์ = c:- เมื่อพรอมต์คำสั่งเสร็จสิ้นให้ปิดลบไดรฟ์กู้คืนและรีบูตระบบของคุณ ตอนนี้ไม่ควรมีปัญหาในการบู๊ต
ข้อเสียเพียงประการเดียวของการแก้ปัญหาเหล่านี้คือพวกเขาต้องการไดรฟ์สำหรับการกู้คืนความอดทนและความอดทน อย่างไรก็ตามหากคุณทำตามที่อธิบายไว้คุณควรแก้ไขข้อผิดพลาดที่คุณได้รับและใช้อุปกรณ์ของคุณต่อไปเหมือนเดิม
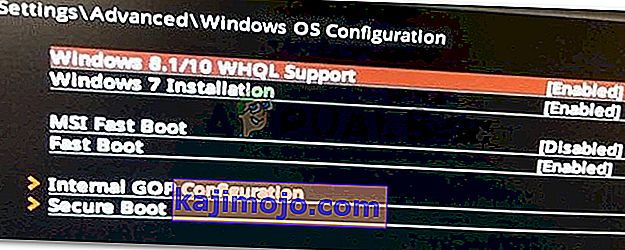
วิธีที่ 3: เปิดใช้งานการสนับสนุน Windows 10 WHQL ใน BIOS
การตั้งค่าการสนับสนุน Windows 10 WHQL มีอยู่ใน OEM บางตัว มีฟังก์ชั่นพื้นฐานสองอย่าง: ตรวจสอบไดรเวอร์ที่ลงนามในระหว่างกระบวนการบูตและอนุญาตให้คุณเปิดใช้งานการสนับสนุน UEFI หากคุณใช้ Windows 10 คุณต้องเปิดใช้งานจากนั้นคอมพิวเตอร์ของคุณจึงจะบูตได้ตามปกติ อย่างไรก็ตามหากไม่ได้เลือกคอมพิวเตอร์ของคุณอาจบูตเข้าสู่ข้อผิดพลาด 0xc000000e ดังนั้นคุณสามารถเข้าถึง BIOS เพื่อดูว่าเปิดใช้งานการตั้งค่าการสนับสนุน Windows 10 WHQL หรือไม่ ถ้าไม่เปิดใช้งานเพื่อทดลองใช้
คุณควรทราบว่าการตั้งค่าการสนับสนุน Windows 10 WHQL ไม่ได้รับการสนับสนุนในคอมพิวเตอร์ทุกเครื่อง หากคอมพิวเตอร์ของคุณไม่มีคุณสามารถตรวจสอบว่ามีการเปิดใช้งานการรองรับ UEFI บนคอมพิวเตอร์ของคุณหรือไม่ หากไม่เป็นเช่นนั้นคุณสามารถเปิดใช้งานเพื่อดูว่ารหัสข้อผิดพลาด 0xc000000e หายไปหรือไม่ ในการเปิดใช้งาน:
- ปิดคอมพิวเตอร์ของคุณอย่างสมบูรณ์และปล่อยให้นั่งอย่างน้อยสองสามนาที
- หลังจากแน่ใจว่าเวลาผ่านไปเพียงพอแล้วให้เริ่มการสำรองข้อมูลคอมพิวเตอร์และคุณควรสังเกตตัวเลือก“ กดปุ่มนี้เพื่อบูตเข้าสู่โหมด Bios ”
- กดปุ่มเพื่อบูตเข้าสู่โหมด Bios
- หลังจากบูตในโหมด Bios สำเร็จแล้วให้ตรวจสอบว่ามีการตั้งค่า Windows WHQL ใน Bios หรือไม่
- หากมีอยู่ให้กด“ Enter”เพื่อเลือกหลังจากไฮไลต์โดยใช้ปุ่มลูกศรแล้วเลือกตัวเลือก“ เปิดใช้งาน”เพื่อเปิดใช้งานบนคอมพิวเตอร์ของคุณ
- ตรวจสอบดูว่าวิธีนี้ช่วยแก้ปัญหาได้หรือไม่

หากข้อผิดพลาดในการบูต Windows 10 0xc000000e ยังคงปรากฏขึ้นหลังจากเปิดใช้งานการตั้งค่า Windows 10 WHQL Support หรือการสนับสนุน UEFI คุณอาจต้องรีเซ็ตการกำหนดค่า BIOS / UEFI บนคอมพิวเตอร์ของคุณ
วิธีที่ 4: สร้าง BCD ใหม่ผ่าน Easy Recovery Essentials
Easy Recovery Essentials เป็นคุณลักษณะการซ่อมแซมระบบอัตโนมัติในคลิกเดียวที่รวมการซ่อมแซมและสร้าง BCD ใหม่ทั้งหมดเพื่อแก้ไขข้อผิดพลาด“ 0xc000000e” แม้ในกรณีที่ Windows ไม่สามารถบู๊ตได้เนื่องจากข้อผิดพลาด
ส่วนประกอบซ่อมแซมการบูตอัตโนมัติของ EasyRE จะแก้ไขปัญหาที่เกี่ยวข้องกับ BCD ทั้งหมดแก้ไข BCD หรือสร้างใหม่ตั้งแต่ต้นโดยใช้การเข้ารหัสและเส้นทางที่ถูกต้องสำหรับพาร์ติชันที่ปฏิเสธที่จะโหลดอย่างถูกต้อง นอกจากนี้ยังจะทำเครื่องหมายดิสก์ว่าออนไลน์เพื่อให้แน่ใจว่าทำงานได้อย่างถูกต้อง
Easy Recovery Essentials รับประกันว่าจะแก้ไขข้อผิดพลาด“ 0xc000000e” โดยอัตโนมัติโดยใช้ตัวเลือก Automated Repair ในตัว ปัจจุบัน EasyRE มีให้บริการสำหรับ Windows XP, Vista, 7, 8, 10 และสามารถดาวน์โหลดและสร้างบนพีซีเครื่องใดก็ได้
- ดูคอมพิวเตอร์เครื่องอื่นที่คุณสามารถใช้สร้าง USB ที่เราจะใช้ในการบูตคอมพิวเตอร์
- ดาวน์โหลด Easy Recovery Essentials จากที่นี่

- เบิร์นภาพ
- บูตเครื่องพีซีของคุณจากซีดี Easy Recovery Essentials หรือ USB ที่คุณสร้างขึ้น
- Once EasyRE is running, choose the “Automated Repair” option and click Continue.
- After EasyRE scans your computer’s drives, identify and select the drive letter for your Windows installation from the list, and then click on the Automated Repair Option to begin.
- Easy Recovery Essentials will start analyzing the selected drive for problems. EasyRE will test for and attempt to automatically correct errors with the disk, partition, bootsector, filesystem, bootloader, and registry. No intervention is required, as EasyRE’s repair is fully automated.
- Once the process is complete, EasyRE will report its findings. Click on the Restart button to reboot your PC and test the changes.

Method 5: Reset BIOS/UEFI Configuration
Some users said that their error 0xc000000e issue is solved by resetting the BIOS/UEFI configuration. So, you can consider trying this method to see whether this issue can be solved.
Step 1. Open BIOS Menu
To reset BIOS to default settings, you need to access the BIOS menu and find the Default Settings option first.
Windows 10 users can access advanced startup options Windows 10 and get into the BIOS menu. You can click Start -> Power, press and hold the Shift key, and click Restart button to reboot Windows into Windows Recovery Environment. Then click Troubleshoot -> Advanced Options -> UEFI Firmware Settings, and click Restart to enter into the BIOS settings screen.
Alternatively, you can also restart your computer normally and press the required key in the startup screen to boot into the BIOS settings window. The hotkey is varied from different computer manufacturers, and it could be F12, Del, Esc, F8, F2, etc.
Step 2. Find the Setup Defaults Option
The name and location of the “Setup Defaults” option may be different from various computers. It generally calls like: Load Default, Load Setup Defaults, Load Default Settings, Load BIOS Defaults, Load Optimal Defaults, etc.
Use the arrow keys on the computer keyboard to find the BIOS setup default option in the BIOS settings screen. You may find it in one of the BIOS tabs.
Step 3. Reset BIOS
After you find the Load Setup Defaults option, you can select it and press the Enter button to start resetting the BIOS to factory default settings in Windows 10.
At last, you can press F10 to save and exit BIOS. Your computer will automatically reboot. If you need to change BIOS settings again in the future, you can follow the same instructions to access BIOS again to change it.
Method 6: Mark Boot Disk As Online
It is possible in some cases, that the disk that you have connected to the computer or the USB that you are trying to boot from has been marked as offline by the computer. Some computers tend to prevent extra applications, hardware, and other things from being able to run as soon as the computer starts because it allows for more convenient and fast startup experience. Therefore, in this step, we will be marking the Disk as online.
You still need to use a bootable USB medium to do this job. We will show you a step-by-step guide here:
- After booting your computer from the bootable USB drive, you need to go to Next > Repair your computer. Then, you will enter WinRE.
- Go to Troubleshoot > Advanced options > Command Prompt.
- Make sure to properly enter your login credentials if you are asked by the computer.
- Type in the following command inside the command prompt to successfully launch the disk part utility on your computer.
diskpart
- Type in either one of the following commands in the next window to list the currently connected disk drives to your computer.
List Disk List Volume
- Once the disks have been listed, you need to identify the disk that contains the Windows operating system and the one that you want to mark as active.
- After identifying it, select the disk using the following command and replacing the alphabet with the driver letter of that disk.
select disk A Select Volume A (Replace A with the Drive Letter)
- After you have successfully selected the disk, you must mark the disk as online in order to initiate the recognization process of the disk at startup. Use the following commands to do that.
Online Disk Online Volume
- Type in the following command to successfully get out of the command prompt and restart your computer after that.
Exit
- Check to see if marking the Disk as online has fixed your issue.

Method 7: Check your data cables, BIOS and drivers
Unplug all HDD data cables, and then plug them again. Revert to the previous drivers and BIOS settings if they were changed, or use “Restore factory settings” option in the BIOS. Make sure to write down all current BIOS settings that were previously selected, just in case it is required to switch back. If the error is caused by a change of the SATA disk controller’s mode in the BIOS or firmware, the fix can be as simple as entering the BIOS and toggling the SATA controller’s “mode” setting. The exact instructions differ from one manufacturer to the other, but the options will resemble what is shown in the screenshots below.
To check the boot order, follow these steps:
- Restart the computer
- Press the necessary key to open the BIOS menu. This key depends on the computer manufacturer and computer model. This is usually listed on the first screen that appears on the monitor. It can be any of the following: Esc, Del, F2, F8, F10 or F12.
- If the screen shows multiple keys, find the key to open “BIOS”, “setup” or “BIOS menu”
- Attempt to toggle between all three (or more) modes until a combination that results in Windows booting successfully once more is found.
Method 8: Boot Windows In Safe Mode
If above solutions didn’t fix the problem, then Start Windows into safe mode. This will start your PC with minimum system requirements, will not load startup programs, add-ons etc. And allow performing troubleshooting steps to fix Boot Error 0xc000000e:
Before you enter the safe mode, you need to enter the Windows Recovery Environment (winRE). To do this, you will repeatedly turn your device OFF, then ON:
- Hold down the power button for 10 seconds to turn off your device.
- Press the power button again to turn on your device.
- On the first sign that Windows has started (for example, some devices show the manufacturer’s logo when restarting) hold down the power button for 10 seconds to turn off your device.
- Press the power button again to turn on your device.
- When Windows restarts, hold down the power button for 10 seconds to turn off your device.
- Press the power button again to turn on your device.
- Allow your device to fully restart and you should boot into the Windows Recovery Environment.
Now that you are in the Windows Recovery Environment, you will follow these steps to take you to safe mode:
- On the Choose an option, screen, select “Troubleshoot” and then “Advanced options.”

- Now click on “Startup Settings” and click on “Restart.”
- After your device restarts, you’ll see a list of options. Select option “4” from the list or press “F4” to enter Safe Mode.

Note: If you need to exit safe mode, simply restart your device, or:
- Press the “Windows logo key + R.”
- Type “msconfig” in the Run box and then select “OK”.

- Select the Boot tab and under Boot options, clear the Safe boot checkbox.

Method 9: Check your disk with CHKDSK utility
If the hard drive has its file integrity compromised, it is possible to use built-in Windows CHKDSK utility to scan the disk and fix the file system errors.
- Connect a USB drive that has been made bootable or insert the Windows Installation Disk on your computer.
- After connecting one of these, boot from that connected device.
- After booting your computer from the device, click on “Next” and then on the “Repair your Computer” option.
- On the next window, click on “Troubleshoot” and then on the “Advanced” Option.

- On the next screen, make sure to select the “CommandPrompt” option to successfully launch into the command prompt.
- Provide the login credentials of your account in order to boot inside the cmd.
- Inside the command prompt, type in the following command to successfully run the check disk utility on your computer.
chkdsk C: /f (Make sure to replace the "C" with the Drive letter of your partition).
- Confirm any on-screen prompts and wait for the scan to be fully completed.
- Check to see if the issue is fixed by performing this step.
Method 10: Disable fast startup Feature
If your computer has been set up to use the Fast Startup feature, you might be getting this error message on your screen because of doing so. The Fast Startup feature is known to malfunction with some operating systems and hardware combinations.
Basically, when enabled, the feature automatically sends some launch configurations to be stored in your RAM to allow for a faster startup as indicated by its name but this configuration data can sometimes be corrupted which can lead to this error on your computer. Therefore, in this step, we will be disabling it completely. For that:
- Press “Windows” + “R” to open the Run prompt.
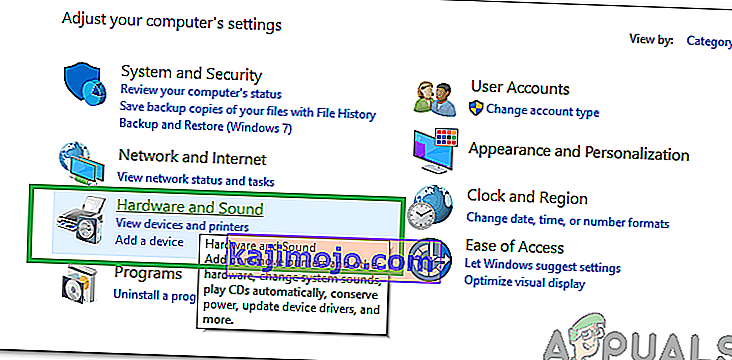
- Type in “Control Panel” and press “enter” to launch the classical Control Panel interface.

- Inside the control panel, click on the “Hardware and Sound” option and then select the “Power Options” button.
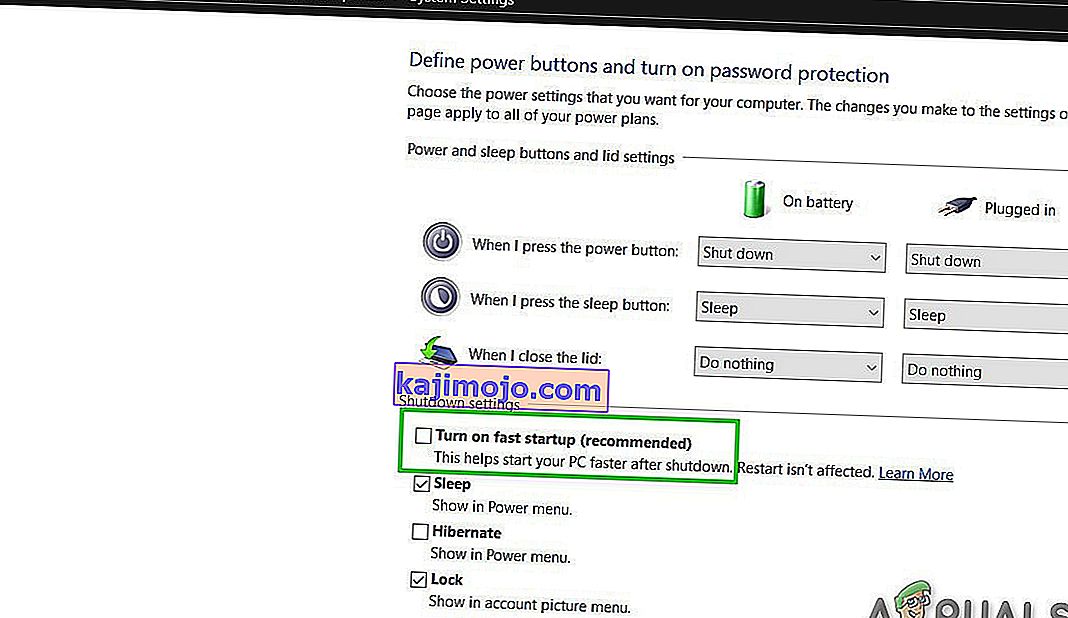
- Inside the power options, click on the “Choose what the power button does” from the left side.
- Click on the “Change Settings” option if the fast startup option is greyed out.
- Make sure to uncheck the “Turn on Fast Startup” option and save your changes.
- Closeout of the window and terminate any unnecessary applications.
- Click on the “Start Menu”, click on the “Power Options” and select “Shutdown” from the list.
- This option should completely power down your computer and after performing a complete shutdown, wait for some minutes before turning your computer back on.
- After the computer turns back on, check to see if the error message is fixed.
Note: This solution can only be applied if you are able to sometimes boot up your computer normally and are only encountering this error momentarily.


Method 11: Repair Corrupted System Files
It also possible in some situations that certain system files might have been corrupted due to a storage failure or due to some other reason. Therefore, in this step, we will be performing a complete repair of the corrupted system files and then we will check to see if doing so fixes this issue. For that:
- Press “Windows” + “R” to open the Run prompt.
- Type in “cmd” and then press “Shift” + “Ctrl” + “Enter” to launch the command prompt with admin privileges.

- Type in the following commands one by one and press “Enter” after each to successfully run an SFC scan and a DISM Scan on your computer.
DISM /Online /Cleanup-Image /RestoreHealth sfc /scannow
- Restart your computer completely once these scans are completed.
- Check to see if by performing these scans, you were able to fix this issue on your computer.

Method 12: Run Windows Startup Repair
Startup Repair is capable of diagnosing and fixing the found issues. For example, it can automatically scan system files, registry settings, configuration settings, etc. and try to fix the problem on its own. Startup Repair is especially useful when your computer is unbootable. Since your computer fails to boot, Windows can boot into WinRE automatically. While, if it doesn’t appear, you can interrupt the boot process three times in a row, and then the WinRE screen appears. Alternatively, if you have a bootable USB medium, you can also set your computer to boot from it and go to Repair your computer to enter WinRE.
After you have successfully booted into the Windows Recovery Environment, click on the “Troubleshoot” option, and from there, select the “Advanced Options” screen. Inside the advanced options, select the “StartupRepair” button to successfully initiate the Startup Repairing process. Windows will begin to diagnose your computer automatically. When the process ends, your computer will restart automatically. You can wait to see whether it can boot successfully.

วิธีแก้ปัญหา:ตรวจสอบให้แน่ใจว่าไม่มีการเสียบอุปกรณ์เพิ่มเติมใด ๆ ก่อนที่จะกระโดดเข้าสู่บรรทัดคำสั่งหรือการซ่อมแซมการเริ่มต้นระบบควรลองรีสตาร์ทอีกครั้งโดยใช้อุปกรณ์และไดรฟ์ภายนอกจำนวนน้อยที่สุดที่เสียบเข้ากับคอมพิวเตอร์ เพื่อให้แน่ใจว่าไม่มีสิ่งใดที่เพิ่งเพิ่มลงในคอมพิวเตอร์ไม่ก่อให้เกิดปัญหานี้ ที่ดีที่สุดคือถอดปลั๊กไดรฟ์ USB, ซีดี, ดีวีดี ฯลฯ ซึ่งรวมถึงเครื่องอ่านการ์ดหน่วยความจำด้วย ตรวจสอบให้แน่ใจว่าได้ถอดไดรฟ์ภายนอกและคีย์ USB หรือจัมป์ไดรฟ์ USB ทั้งหมดแล้วจากนั้นลองอีกครั้ง