Windows 10เป็นหนึ่งใน Windows เวอร์ชันที่ Microsoft คาดหวังมากที่สุด แม้ว่า Windows 8 จะสร้างเทรนด์ใหม่ในโลกของระบบปฏิบัติการเดสก์ท็อป แต่ก็มีปัญหาบางประการในการออกแบบและประสิทธิภาพที่เป็นจุดสนใจหลักสำหรับ Microsoft ใน Windows 10 ดังนั้น Windows 10 Final Build จึงได้รับการเปิดเผยในวันที่ 29 กรกฎาคม 2015 สำหรับเดสก์ท็อป เช่นเดียวกับสมาร์ทโฟน
มันรวมถึงการปรับเปลี่ยนมากมายโดยคำนึงถึงข้อบกพร่องของ Windows 8 ในความเป็นจริงมันเป็น Windows เวอร์ชันขั้นสูง แต่ถึงกระนั้นก็ยังมีผลที่ตามมามากมายเกิดขึ้นทุกวันกับผู้ใช้ที่แตกต่างกัน
ส่วนสำคัญของผลที่ตามมาคือข้อผิดพลาดที่เกิดขึ้นเมื่อพยายามทำงานบางอย่าง มีผู้คนจำนวนมากพบข้อความแสดงข้อผิดพลาดขณะพยายามเปิดซอฟต์แวร์และเบราว์เซอร์ต่างๆภายใน Windows 10 ข้อผิดพลาดนี้มาพร้อมกับข้อความแสดงข้อผิดพลาดที่แจ้งว่าแอปพลิเคชันไม่สามารถเริ่มทำงานได้อย่างถูกต้อง (0xc0000005) คลิกตกลงเพื่อปิดโปรแกรม ข้อผิดพลาดนี้มักเกิดขึ้นกับอินเทอร์เน็ตเบราว์เซอร์แต่ไม่ จำกัด เฉพาะสิ่งเหล่านี้ แอปพลิเคชันใด ๆ ใน Windows สามารถหยุดการตอบสนองได้เนื่องจากข้อผิดพลาดนี้ ดังนั้นจึงจำเป็นต้องได้รับการแก้ไขเพื่อให้ซอฟต์แวร์ที่จำเป็นเหล่านั้นกลับมาใช้งานได้

11/12/2016: ผู้ใช้รายงานว่าวิธีการด้านล่างนี้จะใช้ได้กับ Windows 7 ด้วย
เหตุผลเบื้องหลังข้อผิดพลาด Windows 10 0xc0000005:
มีสาเหตุหลายประการที่ทำให้เกิดข้อผิดพลาดนี้รบกวนการทำงานของซอฟต์แวร์ต่างๆใน Windows 10 สาเหตุหนึ่งที่ถือเป็นสาเหตุสำคัญคือโปรแกรมป้องกันไวรัสของ บริษัท อื่นที่ทำให้เกิดความขัดแย้งกับไฟล์ปฏิบัติการและมีผลต่อการทำงาน ในทางกลับกันการลงทะเบียนอาจได้รับความเสียหายเนื่องจากมัลแวร์และไวรัสทำให้โปรแกรมทำงานผิดปกติ บางครั้งไดรเวอร์ฮาร์ดแวร์ที่ไม่ดีอาจเป็นตัวการที่ทำให้เกิดข้อผิดพลาดนี้ได้
แนวทางแก้ไขข้อผิดพลาด Windows 10 0xc0000005:
จากเหตุผลที่กล่าวมาข้างต้นการแก้ปัญหาจึงตรงไปตรงมา ดังนั้นทำตามวิธีการต่อไปนี้เพื่อกำจัดข้อความแสดงข้อผิดพลาดที่น่าหงุดหงิดนี้
ซ่อมแซมไฟล์ระบบที่เสียหาย
ดาวน์โหลดและเรียกใช้ Restoro เพื่อสแกนและกู้คืนไฟล์ที่เสียหายและหายไปจากที่นี่เมื่อดำเนินการตามแนวทางแก้ไขด้านล่างเสร็จแล้ว เป็นสิ่งสำคัญเพื่อให้แน่ใจว่าไฟล์ระบบทั้งหมดยังคงสมบูรณ์และไม่เสียหายก่อนดำเนินการแก้ไขปัญหาด้านล่าง
วิธี # 1: แก้ไขโปรแกรมป้องกันไวรัส
โปรแกรมป้องกันไวรัสสามารถมีผลต่อไฟล์ปฏิบัติการของโปรแกรมต่างๆ ดังนั้นในการแก้ไขปัญหานี้คุณจะต้องปิดการใช้งานโปรแกรมป้องกันไวรัสของ บริษัท อื่นเพื่อตรวจสอบว่าเป็นผู้ร้ายหรือไม่ โปรดทราบว่าการปิดใช้งานโปรแกรมป้องกันไวรัสอาจส่งผลให้เกิดภัยคุกคามร้ายแรงต่อคอมพิวเตอร์ของคุณเมื่อเชื่อมต่อกับอินเทอร์เน็ต
นอกจากนี้คุณยังสามารถพึ่งพาซอฟต์แวร์รักษาความปลอดภัยของ Windows' ของตัวเองเช่นWindows Defender มีการทำงานเช่นเดียวกับโปรแกรมป้องกันไวรัสอื่น ๆ คุณสามารถปิดใช้งานโปรแกรมป้องกันไวรัสได้โดยไปที่การตั้งค่าและปิดการป้องกัน

หลังจากปิดใช้งานแล้วให้ตรวจสอบข้อผิดพลาดอีกครั้ง หากยังคงมีอยู่ให้ย้ายไปที่วิธีถัดไป
วิธี # 2: แก้ไขการลงทะเบียน
รีจิสทรีเป็นฐานข้อมูลกลางของ Windows ที่อยู่ตลอดเวลาถูกใช้โดยคอมพิวเตอร์ของคุณเพื่อช่วยให้มันอ่านไฟล์ที่แตกต่างกันและการตั้งค่าที่จะต้องวิ่ง การลงทะเบียนอาจได้รับความเสียหายเนื่องจากความเสียหายของไฟล์บางไฟล์ที่จำเป็นในการวางซ้อนทุกอย่าง ดังนั้นผู้เชี่ยวชาญส่วนใหญ่จึงแนะนำให้คุณสำรองข้อมูล Registry ของคุณและเก็บข้อมูลสำรองนี้ไว้ในแท่ง USB แบบเดิมเพื่อที่คุณจะสามารถฟื้นฟู Registry ของคุณในสถานะก่อนหน้านี้ได้ในกรณีที่เกิดความเสียหาย แต่ถ้าคุณไม่ได้สำรอง Registry ของคุณทำตามขั้นตอนเหล่านี้เพื่อลงทะเบียนแก้ไขเพื่อแก้ไขข้อผิดพลาด0xc0000005
1. ดาวน์โหลดซอฟต์แวร์ทำความสะอาดรีจิสทรีจากลิงค์นี้
2. หลังจากดาวน์โหลดแล้วให้ติดตั้งโดยใช้การตั้งค่าที่แนะนำ เปิดซอฟต์แวร์หลังจากกระบวนการติดตั้งเสร็จสิ้น
3. ในอินเตอร์เฟซให้คลิกที่Registryแท็บปัจจุบันในบานหน้าต่างด้านซ้ายและคลิกที่ปุ่มที่มีข้อความเป็นสแกนหาปัญหา จะเริ่มค้นหาข้อผิดพลาดในรีจิสทรีและเมื่อการค้นหาเสร็จสิ้นปุ่มแก้ไขปัญหาที่เลือกจะเปิดใช้งาน คลิกที่ปุ่มนั้นและทุกอย่างจะได้รับการแก้ไข

วิธีที่ 3: การแก้ไขไดรเวอร์ที่ผิดพลาด
ไดรเวอร์คือโปรแกรมซอฟต์แวร์ที่ช่วยให้คอมพิวเตอร์สื่อสารกับฮาร์ดแวร์ที่เชื่อมต่ออยู่ ดังนั้นเมื่อพวกเขาได้รับความเสียหายฮาร์ดแวร์มีแนวโน้มที่จะทำให้เกิดความบกพร่อง การแก้ไขนักดำน้ำที่ผิดพลาดเหล่านี้สามารถช่วยคุณได้หลายวิธี ทำตามขั้นตอนด้านล่าง
1. เปิดDevice Manager โดยกดWin + Xแล้วเลือกจากรายการ
2. ภายใน Device Manager ให้เลื่อนลงเพื่อดูว่ามีฮาร์ดแวร์ที่มีเครื่องหมายสีเหลืองหรือไม่ ถ้ามีแล้วคลิกขวาไปที่นั่นและเลือกการปรับปรุงซอฟแวร์ไดร์เวอร์ หากคุณเพิ่งติดตั้งไดรเวอร์ให้ติดตั้งไดรเวอร์เหล่านั้นใหม่ด้วย

3. บนหน้าต่างที่ปรากฏขึ้นหลังจากนั้นให้คลิกที่ค้นหาโดยอัตโนมัติสำหรับซอฟต์แวร์ไดรเวอร์ที่อัปเดตเพื่อให้มันค้นหาและติดตั้งไดรเวอร์โดยอัตโนมัติ ในกรณีถ้าคุณดาวน์โหลดไดรเวอร์ด้วยตนเองให้คลิกที่ตัวเลือกด้านล่างเพื่อเรียกดูและติดตั้ง หลังจากดำเนินการเสร็จสิ้นให้ตรวจสอบข้อผิดพลาด

วิธี # 4: แก้ไข BCD
วิธีนี้จะต้องดำเนินการโดยผู้ใช้ที่มีความเสี่ยงเอง สิ่งนี้ได้ผลสำหรับบางคนและไม่ได้ผลสำหรับบางคน คุณจะต้องเปิดใช้งาน Windows อีกครั้งหลังจากทำตามขั้นตอนในคู่มือนี้
- ถือปุ่ม Windowsและกด X เลือกพร้อมรับคำสั่ง (ผู้ดูแลระบบ)
- พิมพ์“ bcdedit”แล้วกด ENTER หาก Windows Boot Loader Path ของคุณคือ xOsload.exe คุณจะต้องลบไฟล์บางไฟล์และซ่อมแซม BCD ของคุณ คุณจะเห็นสิ่งนี้ในฟิลด์ PATH หลังจากที่คุณรันคำสั่ง“ bcdedit”
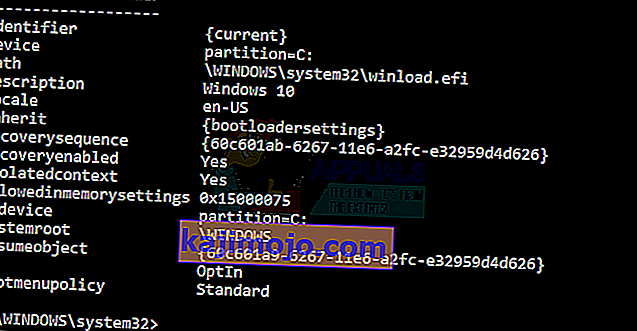
- เมื่อทำเสร็จแล้วให้ดำเนินการคำสั่งต่อไปนี้ด้านล่างบางคำอาจไม่พบ แต่ไม่สนใจข้อผิดพลาดและดำเนินการต่อไป ตรวจสอบให้แน่ใจว่าคุณกดปุ่ม ENTER หลังจากแต่ละคำสั่ง

Del D:\Windows\System32\xOsload.exe Del D:\Windows\System32\xNtKrnl.exe Del D:\Windows\System32\Drivers\oem-drv64.sys attrib c:\boot\bcd -h -r -s ren c:\boot\bcd bcd.old bootrec /rebuildbcd
Method 5: Checking for Windows Updates
Windows Updates often contain fixes for some bugs and glitches but they are also notorious for giving way to new issues on people’s computers. However, in this step, we will be checking for any updates for your Operating system because Microsoft often patches any issues that come from their updates. In order to do that, follow the guide below.
- Press “Windows’ + “I” to open Windows settings.
- In the settings, click on the “Updates and Security” option and from the left side, select the “Windows Update” option.

- On the next screen, click on the “Check for Updates” option and it will automatically prompt Windows to check for any available updates.
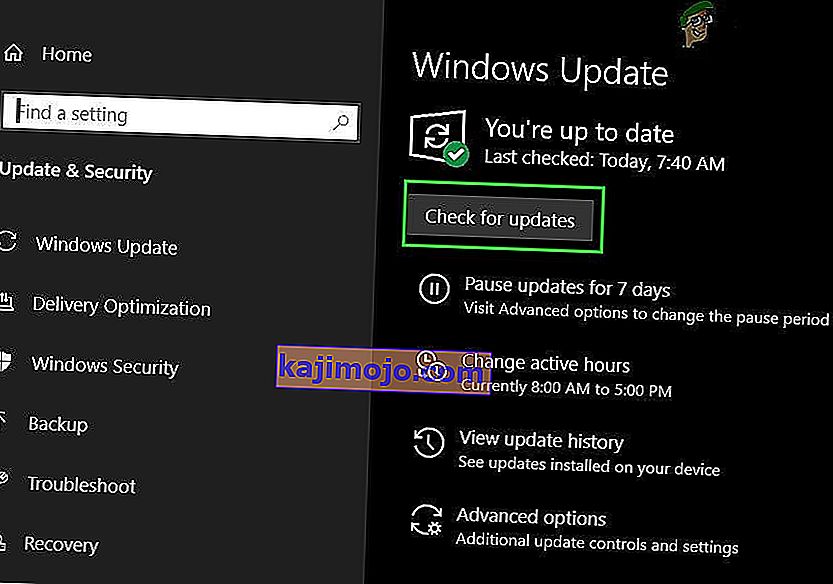
- After the update check is complete, click on the “Download” button to trigger the downloading and installation of new updates on your computer.
- After these updates have been installed, check to see if doing so has fixed the issue on your computer.


Method 6: Restoring Computer
If you have just started getting this issue, it might be getting triggered due to a faulty driver installation or even due to a rogue application that you might’ve installed on your computer recently. Therefore, in this step, we will be reverting the state of the computer to an earlier date and hopefully, this should get our issue fixed if it was due to the above-stated reasons. In order to do this:
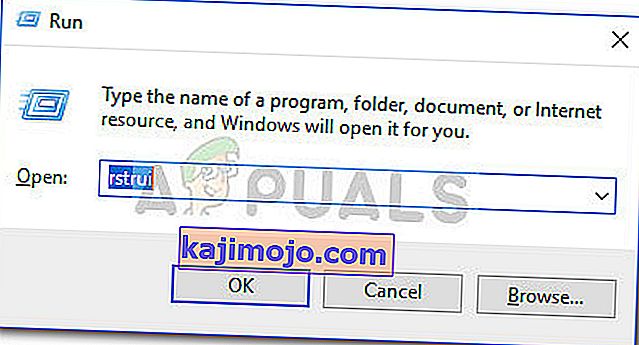
- Press “Windows” + “R” to open the Run prompt.
- Type in “rstrui” and press “Enter” to open the restore management window.
- Click on “Next” and check the “Show more Restore Points” option.
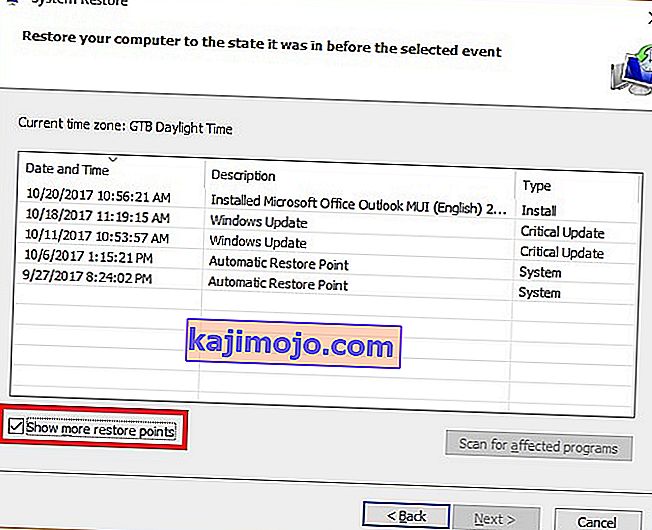
- Select a restore point from the list that is before the date on which this issue started occurring.
- Click on “Next” again and follow the on-screen instructions to revert everything back to the selected date.
- After the restore is completed, check to see if the issue still persists.


Method 7: Enable Firewall
It is possible in some cases, that the error is being triggered because the application is suspicious or at least if it has been marked suspicious and the Windows Firewall isn’t running on your computer to validate this suspicious. Therefore, in this step, we will be making sure that the Windows Firewall is enabled in order to get rid of this error. For that:
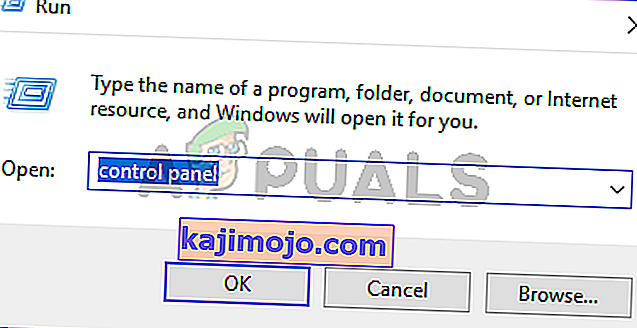
- Press “Windows” + “R” to open the Run prompt.
- Type in “Control Panel” and press “Enter” to launch the classical Control Panel interface.
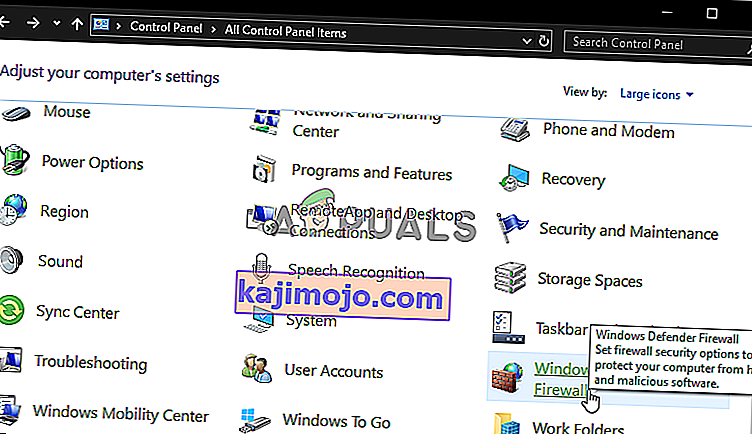
- In the Control Panel, click on the “ViewBy:” option and select the “Large Icons” button.
- After making this selection, click on the “Windows Defender Firewall” option to launch the Firewall and then select the “Turn Windows Defender Firewall On or Off”.
- Make sure to check the “Turn on Windows Defender Firewall” for both the available options to turn the Firewall on.
- After making this selection, save your changes and close out of the Window.
- After doing so, check to see if the issue still persists.


Method 8: Run SFC Scan
In some situations, you might’ve installed a bad driver on your computer or at some point, due to a storage failure, some system files or drivers might’ve been corrupted. Therefore, in this step, we will be running a complete system scan to identify any drivers that are missing signatures or to fix any abnormalities in the system files. For that:
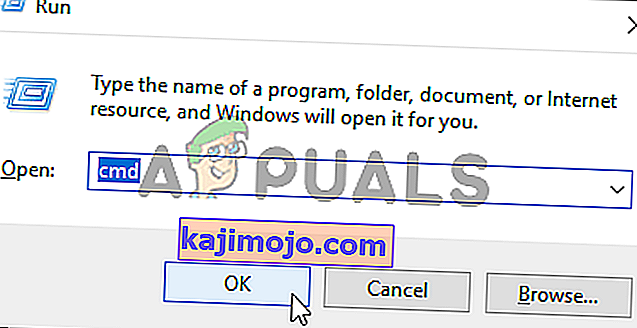
- Press “Windows’ + “R’ to open the Run prompt.
- Type in “cmd” and then press “Shift’ + “Ctrl” + “Enter” to provide admin permissions.Running the Command Prompt
- Type in the following command inside the command prompt and press “Enter” to execute it.
sfc /scannow
- Let the computer scan for any broken or corrupted items and it should automatically replace them with working ones.
- Check to see if doing so fixes the error message.

Method 9: Disabling Data Execution Prevention
Data Execution Prevention is a program that prevents certain programs or executables from being able to run on your computer because it suspects that they might be viruses. Due to this prevention, sometimes, as a false alarm, legit applications might also face issues while trying to run on your computer. Therefore, in this step, we will be disabling this setting from the system configuration panel. For that:
- Press ‘Windows’ + “R’ to open the Run prompt.
- Type in “Control Panel” and press “Enter” to launch the classical control panel interface.

- Inside the Control Panel, click on the “View By:” icon and then select the “Large Icons” option.
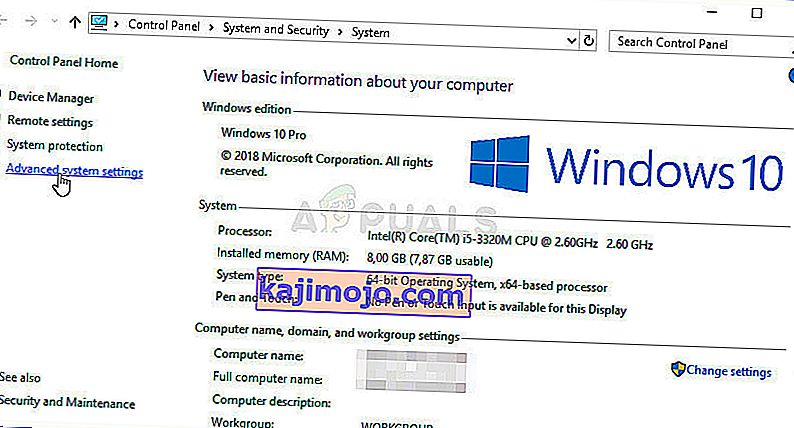
- After selecting Large Icons, select the “System” option.
- Click on the “Advanced System Settings” option on the left side of the screen.
- In the advanced System Settings, click on the “Advanced” tab from the top.
- In the advanced tab, click on the “Settings” option under the “Performance” heading.
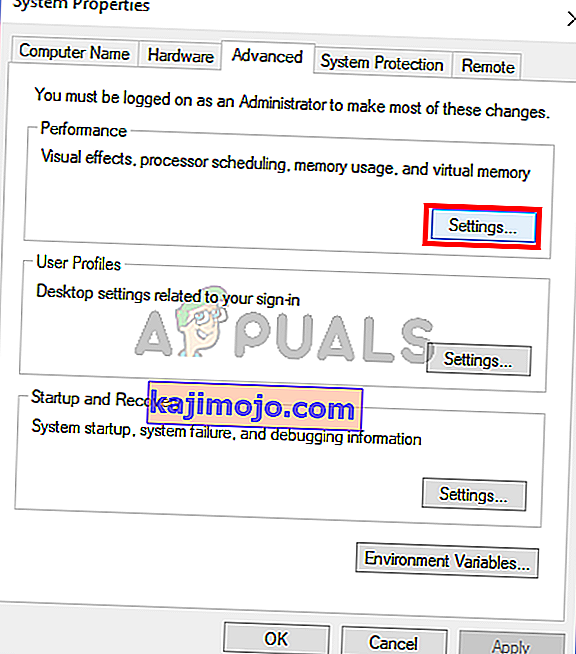
- On the next window that opens up, click on the “Data Execution Prevention” tab, and then select the “Turnon DEP for all programs except thoseI Select” option.
- After that, click on the “Add” option and point to the executable of the application that you are facing issues with.
- This way, that application will no longer come under the jurisdiction of the DEP program.
- Check to see if doing so has fixed the issue.


If the above process is unable to fix the issue, it might be because the executable isn’t the only one being affected by the DEP program. Sometimes the DEP might actually be preventing a herd of executables from being run on the computer and to counter this we will be disabling DEP completely.
Disabling DEP completely cannot be done through any Windows setting and it needs to be done manually through the command prompt. Remember to take this step as a last resort because this can in some cases makes your computer more vulnerable to viruses and malware attacks. In order to disable DEP through the command prompt:
- Press “Windows” + “R’ to open the Run prompt.
- Inside the Run prompt, type in “cmd” and then press “Shift” + “Ctrl” + “Enter” to launch in admin mode.
- Inside the command prompt, type in the following command and press “Enter” to execute it on your computer.
bcdedit.exe /set {current} nx AlwaysOff - Once the command has been executed, run the application that you want to and check to see if the error message still persists.
Method 10: Disable Firewall and Windows Defender
In some situations, the executable that you want to run on the computer might actually be blocked by the Firewall and it would not be able to make contact with its servers this way. Therefore, we will have to allow the executable in our Firewall for both public and private networks which should get it working if the Firewall is preventing it.
In addition to that, sometimes the Windows Defender might prevent the application from running on your computer because its local files might be suspicious and not properly signed. This can be due to a false alarm as well so we will be disabling the Windows Defender for the application as well by adding an exclusion. In order to do that:
- Press “Windows” + “R” to launch the Run prompt.
- Type in “ControlPanel” and press “Enter” to launch the classical control panel interface.
- Click on the “View by:” button, select “Large Icons” and then click on the Windows Defender Firewall option.
- Select the “Allow an app orfeature through the Firewall” button on the left pane and then click on the “Change Settings” button and accept the prompt.
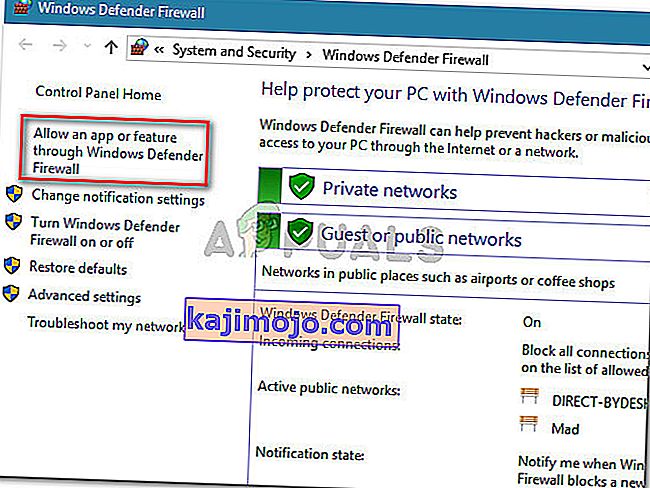
- From here, make sure that you check both the “Public” and the “Private” options for the application and its entries.
- Save your changes and exit out of the window.
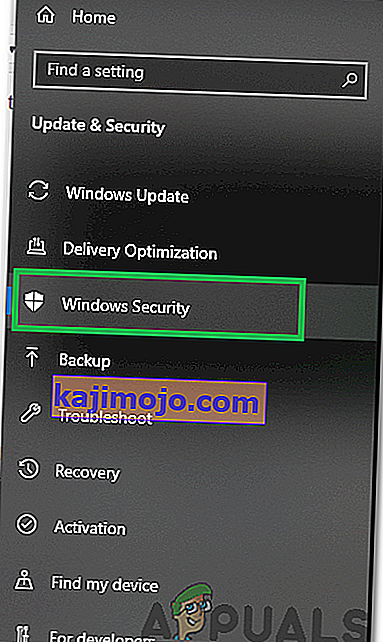
- After that, press “Windows” + “I” to launch the settings and click on the “Updateand Security” option.
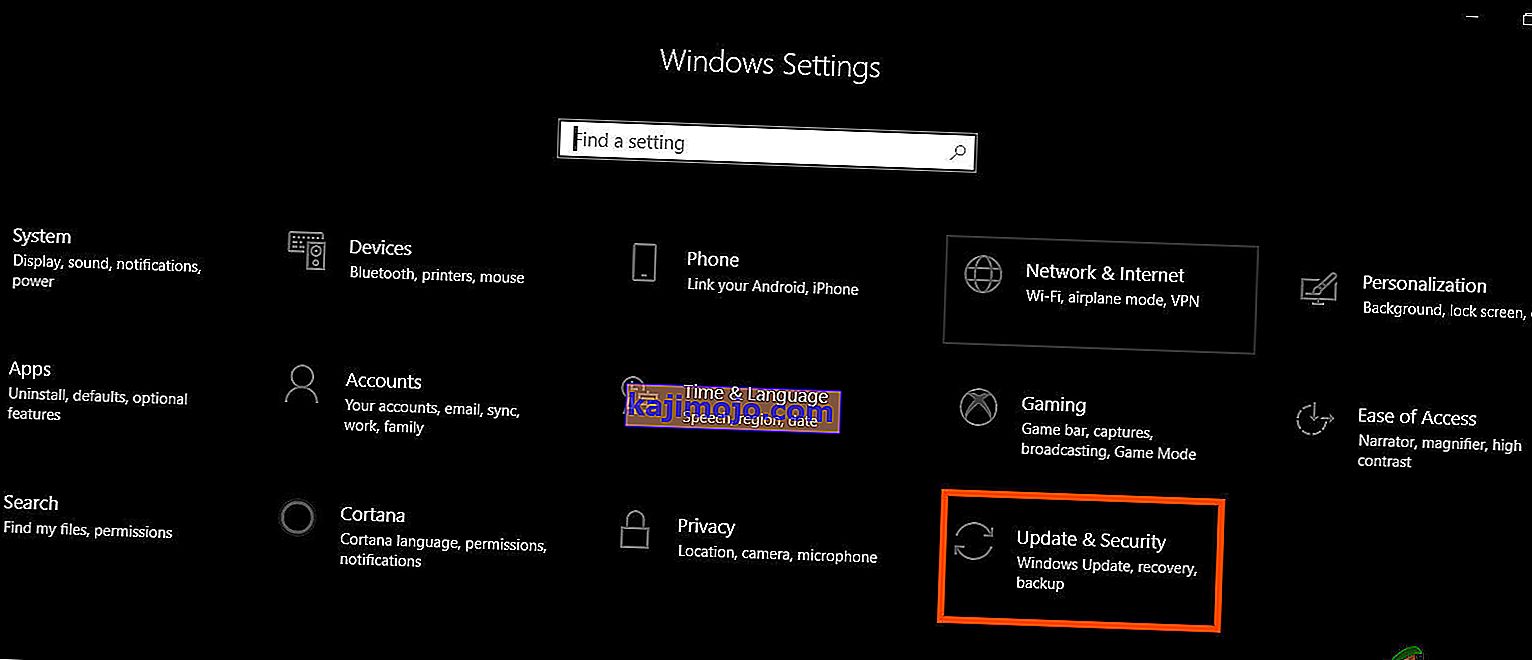
- From the left pane, click on the “Windows Security” button and then click on the “Virus and Threat Protection” button.
- Select the “Manage Settings” button under the Virus and Threat Protection Settings heading.
- Scroll down and click on the “Add or Remove Exclusions” button in the next window.
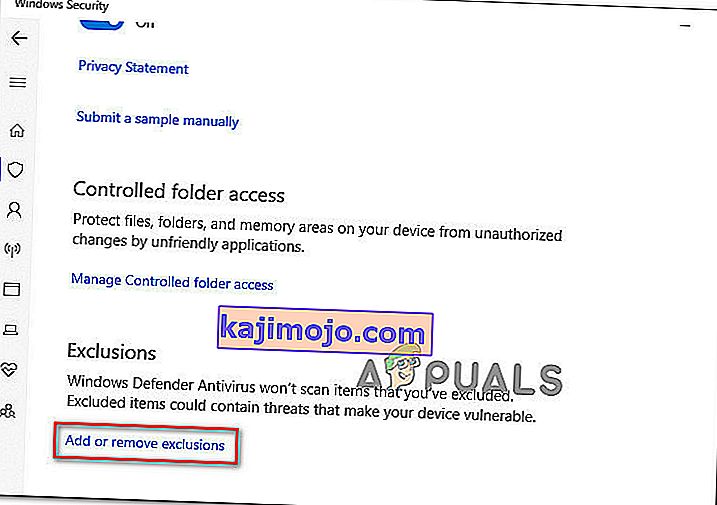
- Click on the “Add an Exclusion” option and select “Folder’ from the File type.
- Make sure to specify the application’s folder with which the issue is occurring and exit out of this window after saving your changes
- Check and see if doing so has fixed the error message.


Method 11: Reinstall Firefox
If you are getting this error while trying to launch Firefox, it might be occurring because the applications haven’t been installed properly on your computer. Therefore, in this step, we will be launching the app management window and uninstalling Firefox after which we will reinstall it completely by downloading it from the Firefox website. For that:
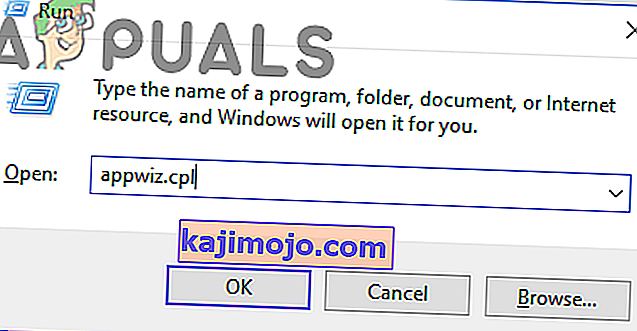
- Press “Windows” + “R” to open the Run prompt.
- Type in “appwiz.cpl” and press “Enter” to open the app management window.
- In the app management window, scroll down and right-click on the “Firefox” application.
- Select “Uninstall” from the list and then follow the on-screen instructions to remove the software from your computer.
- Repeat this step for all instances and bundled applications of the software installed on your computer.
- Make sure to disable any third-party antiviruses at this point to make sure that the software is installed smoothly.
- Head on over to the Mozilla website and click on the download button.

- Click on the downloaded executable and install it on your computer following the on-screen instructions.
- Check to see if doing so has fixed the error message on your computer.


Method 12: Scanning for Malware
It is possible in some cases that the computer has acquired malware that is preventing the user from being able to run all the system functions on their computer. Therefore, in this step, we will be using the default Windows Defender to scan our computer thoroughly for any viruses or malware that might’ve found its way on our computer. For that:
- Press the “Windows” + “I” keys simultaneously on your PC to open the Settings tab.
- Navigate to the Update& Security option and then click on the “Windows Security” button on the left tab.
- After that, click on the “Open Windows Security” and select the “Virus and Threat Protection” option.
- After that, click on the “Scan Options” button below the “Quick Scan” window.
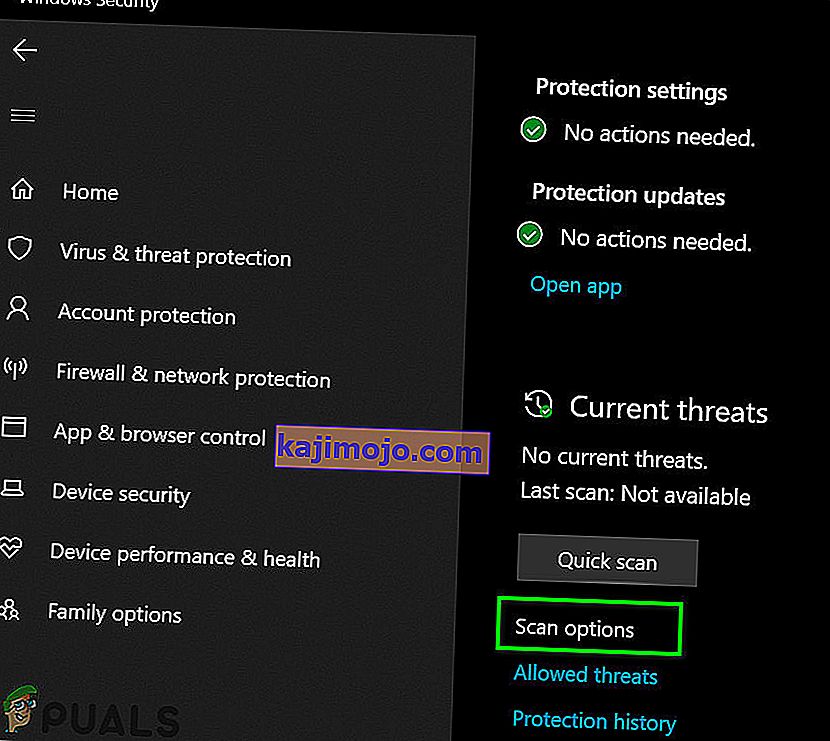
- Click on the “Full Scan” option and then hit the button of “Scan Now”.
- Wait for a few seconds while this process gets completed and then finally check if the error gets resolved now.


Microsoft Security Scanner is an additional tool that you can use to test the system for any further viruses and malware because sometimes the default tool isn’t able to perform the scan properly. Therefore, in this step, if the issue still hasn’t been resolved, we will be using the Microsoft Security Scanner to further make sure for any issues.
- Launch your browser and download the Microsoft Security Scanner from here.
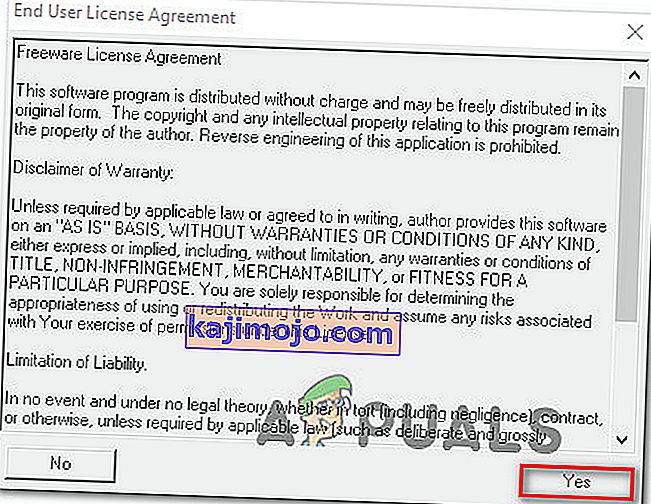
- After downloading the executable, run it on your computer and let it install.
- Accept the License Agreement terms and click on “Next”.
- Select “Full Scan” and click on “Next”.
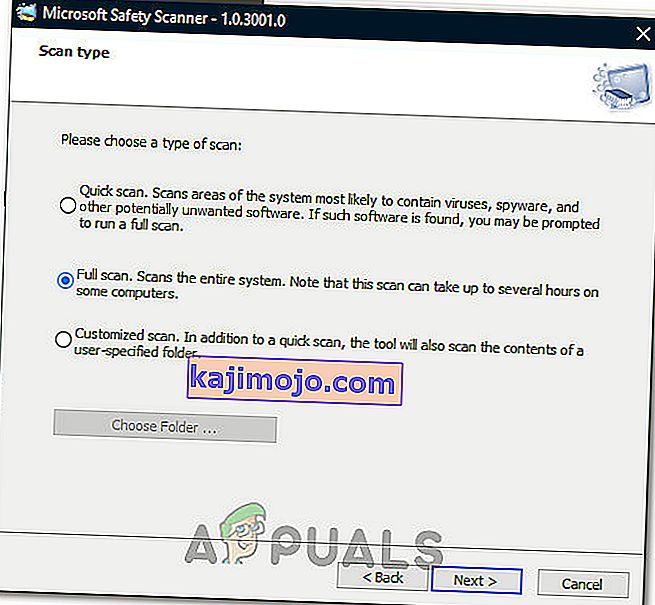
- After you opt for a full scan, the software will start scanning your entire computer to look for any malware or viruses that might’ve disguised themselves as normal executables or applications.
- After this scan has been finished, check to see if the error message still persists.


Method 13: Install Missing Drivers
It is possible in some situations that your device is missing certain drivers due to which this particular issue is being triggered on your computer. Therefore, we will be checking for any missing drivers and then we will check to see if the error is fixed. In order to do this, follow the guide below.
- Download Driver Easy on your computer.

- Run the downloaded executable and install the software on your computer.
- Run the check and see if there are any missing drivers on your computer.
- Install these missing drivers and then install them either manually or automatically using the Software.
- After installing all the missing drivers, check to see if the issue still persists.

Method 14: Reconfigure Registry
It is possible that in some cases, you haven’t properly configured all the registry settings or that you unknowingly configured something incorrectly. Therefore, in this step, we will be reconfiguring our Registry to fix a certain key that sometimes, if misconfigured, causes this particular error on Windows. In order to do this, follow the guide below.
- Press “Windows” + “R” to open the Run prompt.
- Type in “regedit” and press “enter” to launch the registry editor.

- Inside the registry editor, navigate to the following location.
HKLM\SOFTWARE\Microsoft\Windows NT\CurrentVersion\Windows\AppInit_Dlls
- Double click on the “LoadAppInit_DLLs” entry on the right side of the screen.
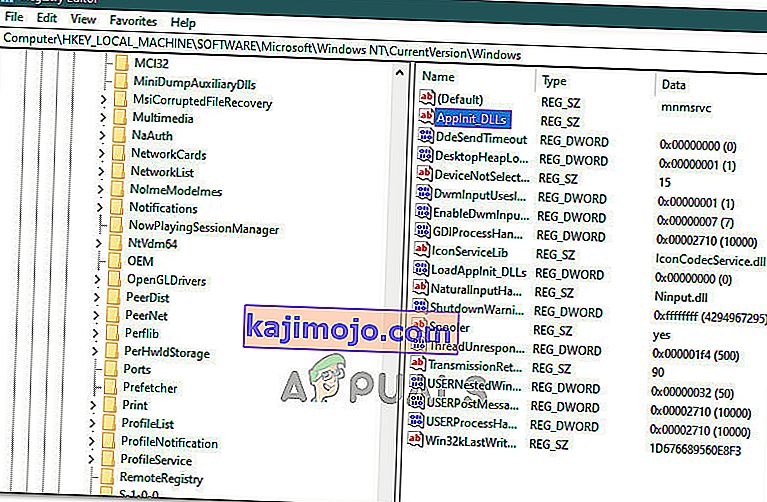
- Change the value of this registry from “1” to “0”.
- Save your changes and exit the registry editor.
- Check to see if doing so has fixed the error.


Method 15: Update Disk Drivers
In some cases, the Disk Drivers that are being used to control your Storage and other Disks installed on the computer might have been outdated due to which the error is being triggered. Therefore, in this step, we will first be opening the Device Management Window and from there, we will be updating these drivers. In order to do so, follow the steps mentioned below.
- Press “Windows’ + “R” to open the Run prompt.
- Type in “Devmgmt.msc” and press “Enter” to launch the device management window.
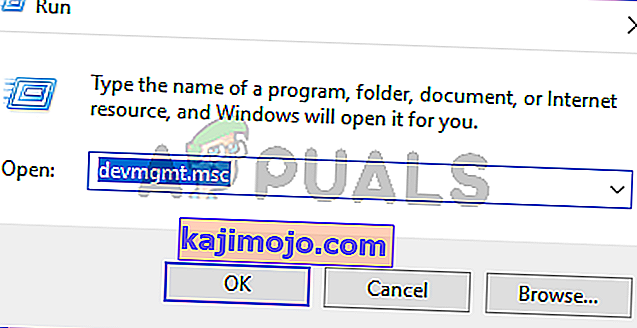
- In the Device Manager, double click on the “DiskDrives” option to expand it.
- Right-click on the storage device listed and select the “Update Driver” option.
- Select the “Search Automatically for Drivers” option and let the setup search.
- If there are any drivers available, Windows will automatically check for them and install them on your computer.
- Check to see if doing so has fixed the issue.


Method 16: Disabling Automatic Updates and Uninstalling Updates
It is possible in some cases, that this error is stemming from a faulty update install. Microsoft is notorious for pushing out updates that aren’t properly customized to work for all hardware combinations and often go on to break things instead of making them better. Therefore we will make sure that the recent update isn’t installed on our computer.
In order to do this, we will have to first disable automatic updates on our computer and then we will be uninstalling the recently installed updates. Make sure to back up any important data that you don’t want to lose just in case this goes bad.
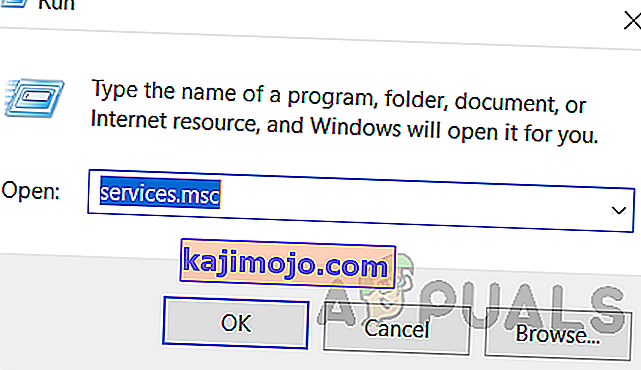
- Press “Windows” + “R’ to open the Run prompt.
- Type in “service.msc” and press “Enter”.
- Scroll through the list and double click on the “Windows Update” service.
- Click on the “Stop” button and then click on the “Startup Type” dropdown.
- Select “Disabled” from the list and select the “Apply” button from the window.
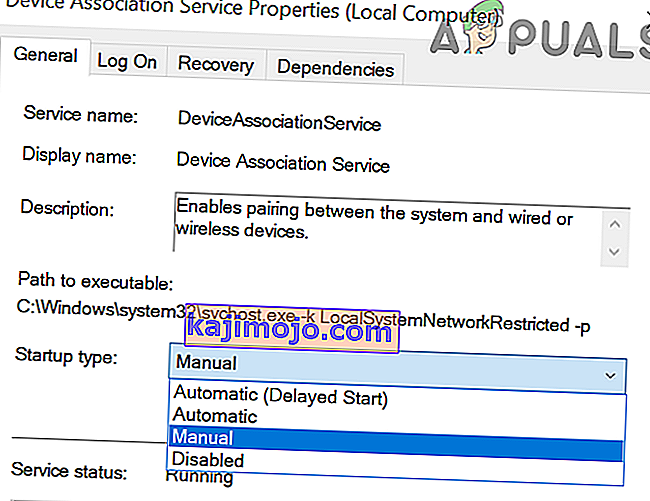
- Click on “OK” to close out of this window.
- Check to see if doing so has stopped your computer from updating.


After stopping the computer from updating, we will now be uninstalling the recent updates that have been installed on your computer. For that:
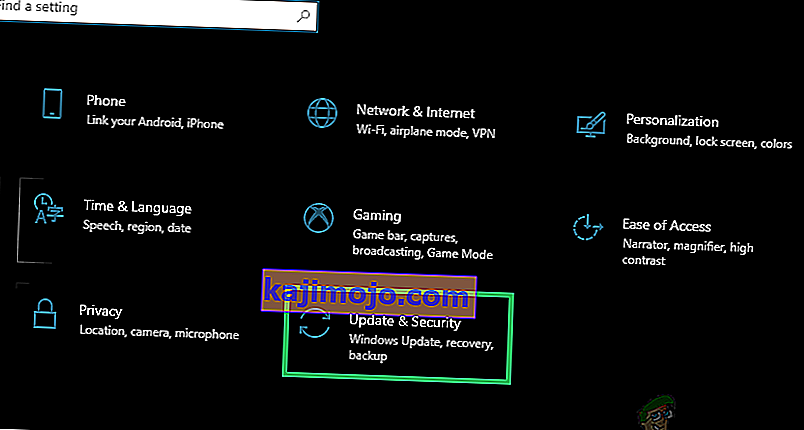
- Press “Windows” + “I” buttons to open the settings.
- In settings, click on the “Update and Security” option and then select the “Windows Update” button from the left pane.
- In the Windows Update, click on the “View Update History” option.
- In the Update History, click on the “Uninstall Updates” option and it should take you to the uninstallation screen where all the recently installed updates will be listed.
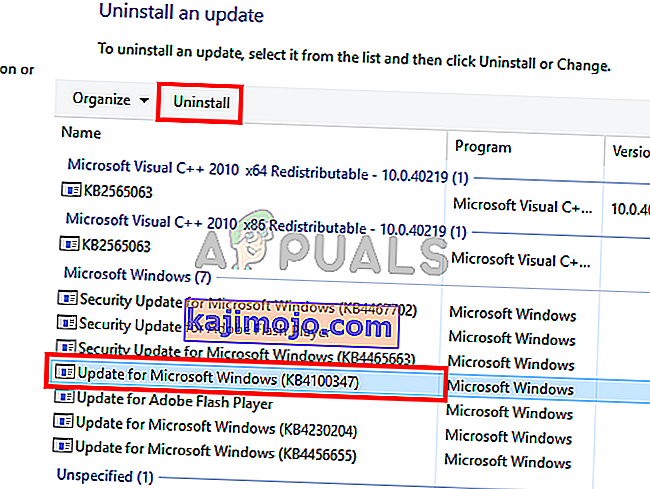
- From the list, right-click on the update that was installed recently and caused this error on your computer.
- Right-click on this update and select the “Uninstall” button to remove it completely from the computer.
- Follow through with the on-screen instructions.
- Check to see if uninstalling has fixed this issue.


Additional Fixes:
- In addition to some of the recommendations given above, you should try to check if there are any bad memory modules (RAM) installed on your computer which can be a cause of this.
- ตรวจสอบให้แน่ใจว่าคุณไม่ได้โอเวอร์คล็อกแรมของคุณในระดับที่เกินขีด จำกัด ที่แนะนำหรือไม่ หากทำเสร็จแล้วให้ลองนำกลับไปใช้ค่าเริ่มต้นจากโรงงานและตรวจสอบว่าสามารถแก้ไขปัญหาของคุณได้หรือไม่